-
Kopari Hydrating Coconut Lip Gloss
Hi Everyone! Today, I am sharing with you my new favorite lip gloss. The Kopari hydrating coconut lip gloss. I struggle to keep my lips from getting dry and chapped all winter long. Now I have a new struggle this year, not getting lip gloss on my mask. I hate getting ready and throwing on some lip gloss just to make my mask moist. It’s clearly disgusting.
I recently discovered Kopari’s lip gloss. You guys know I love their products! I’ve been using it for about a month and it is awesome. It doesn’t get all over my mask’s but it is keeping my lips from getting dry and chapped. If I put it on before I go to bed, I even can still feel it there in the morning. It’s insane. I’ve never had a chapstick or lip gloss that has done that.
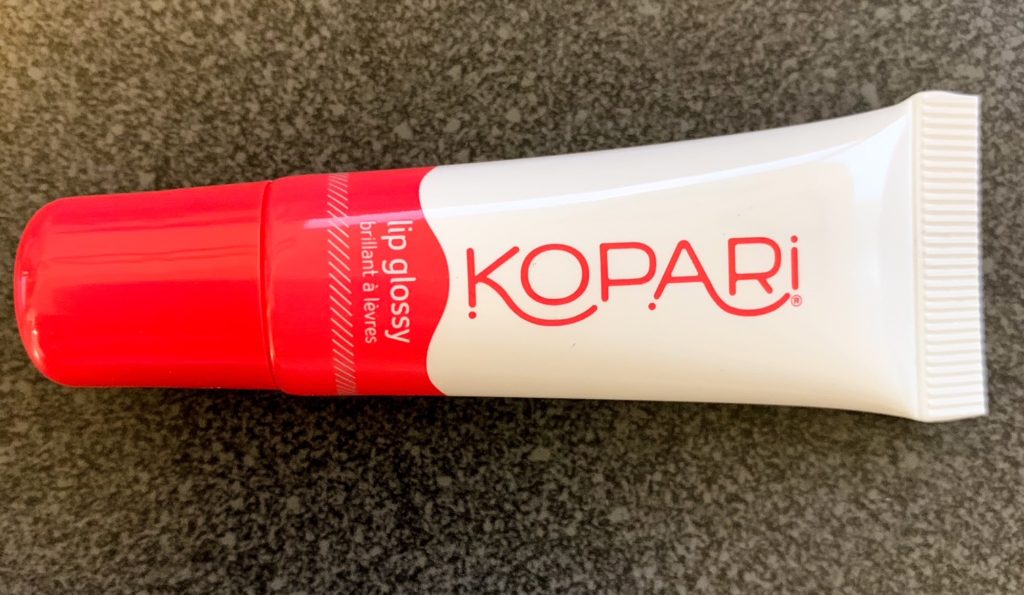
It’s also not sticky or tinted, but it does have a beautiful shine. It is never tested on animals and follows Kopari’s standards: free of parabens, sulfates, and silicones. Some of the ingredients that are in this lip gloss include: shea butter, organic coconut oil, and squalane. Shea butter is high in vitamin A and E. Vitamin E helps your skin to heal and can actually even lessen the appearance of scarring. Coconut oil helps to provide moisture and protection. Squalane helps to lock in moisture and is plant-derived.
I am continually impressed with Kopari’s products and this one is no different.
You can find this product specifically here:
As always, if you use my discount code ACTIVEBEAUTYBLOG20 at checkout, you can get 20% off your entire purchase!
I hope you love this lip gloss as much as I do. Let me know what you think about it in the comments below. If you are looking for more great content, please subscribe.

-
Green Immune Boosting Shot
Hi Everyone!
Today, I am sharing with you a recipe for an immune boosting shot that my sweet friend Trish shared with me. I was surprised with how great they tasted and I thought it would be perfect to share here for the time of year. We can always use a little extra help to boost our immune systems!
Ingredients
1 Cup Fresh Squeezed Orange Juice
1½ Cups of Greens (Made from Power Greens Mix of Kale, Chard, and Spinach)
2-4 Tbsp Ginger Juice
1 Pinch- ¼ tsp Tumeric
1 Tbsp Lemon Juice
Recipe
- Add ingredients to the blender and blend at high speed until you reach a juice consistency.
- Pour the ingredients through a cheesecloth or straining towel to remove any leftover larger pieces.
- Enjoy.
This recipe makes about 10 shots 2 ounces each. Please adjust according to the amount you would like to make. The ginger and turmeric can make the juice taste a little bit spicy so I would start with the smaller amount and work up. You can always add more and reblend your mixture.
These shots have many benefits for our bodies. The oranges are packed with Vitamin C and antioxidants, which can help your body to fight off disease. Leafy greens are very important for good health and are packed with lots of nutrients. Kale is very high in vitamins A, C, and K, which can be very beneficial for immune health. In regards to ginger, It can treat a wide range of diseases via immunonutrition and anti-inflammatory responses. (Ghiasvand et al., 2013, #) According to Healthline.com, Upping your intake of antioxidant-rich foods and beverages like ginger shots may combat inflammation and keep your immune system healthy.They also state that, Ginger and turmeric have powerful anti-inflammatory properties, which could help decrease pain and protect against disease. As you can tell, these immune shots are very beneficial to your body.
I hope you loved today’s post. Thanks again to Trish for being so kind to share it with me and giving me the recipe so that I can share it with you too. Please let me know what you think in the comments below. Subscribe if you’d like to see more of my content.

-
Homemade Sugar Scrub
Hi Everyone!
Today, I am sharing a recipe of how to make your own sugar scrub at home! They are so fun and great to give as gifts this holiday season. They also have a ton of great benefits to using them. My two favorites are peppermint and lavender! It’s great to use for self-care.
Ingredients
1 Cup of Sugar
¼ Cup of Coconut Oil
15 Drops of Essential Oil
Recipe
- Melt your coconut oil in your microwave for 20 seconds. (I just put my entire jar in the microwave).
- Mix your melted coconut oil and sugar together in a bowl.
- Add your essential oil and mix well.
- Place in a jar or airtight container.
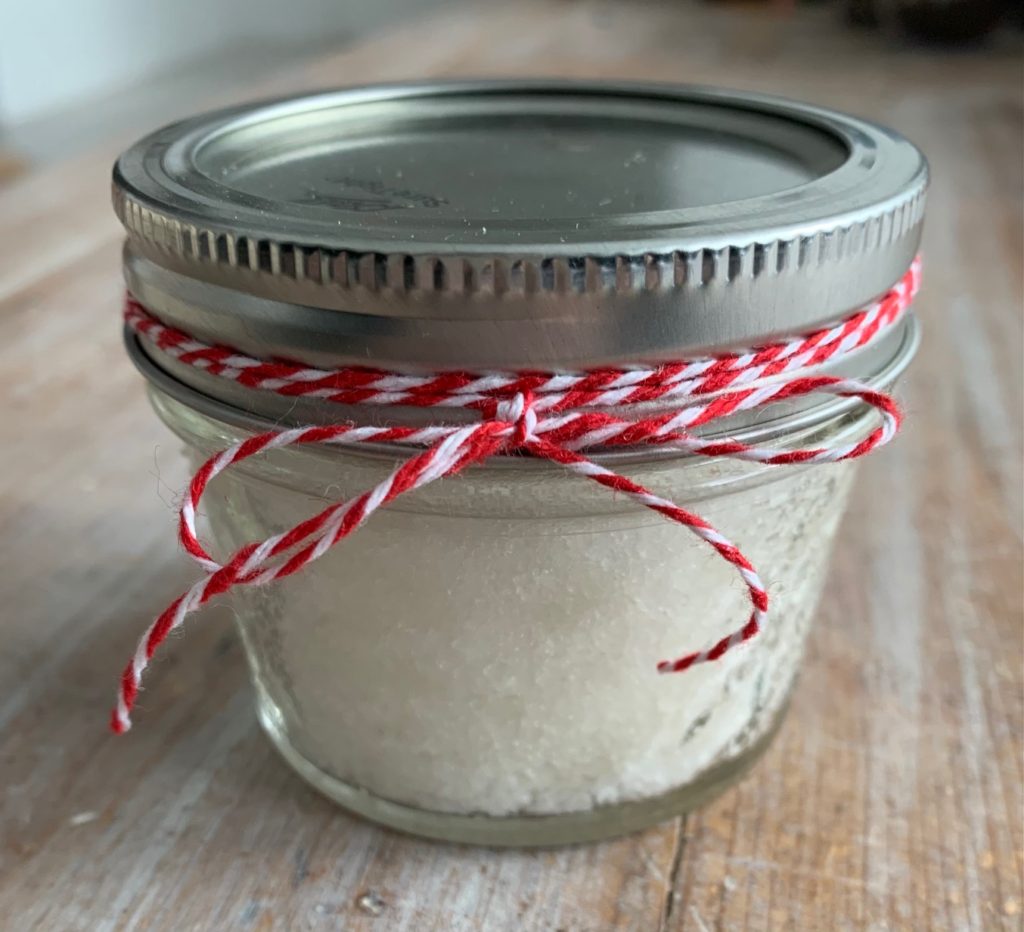
There are many benefits to using a sugar scrub. It helps to gently exfoliate your skin, which removes a layer of dead skin cells and helps to bring your healthier skin to the surface. It can help to unclog your pores and even prevent ingrown hairs. It can help to brighten and even out your skin texture. By evening out your skin texture, it can help to make a tan last longer, real or fake! You can also add an essential oil that helps to calm you and use it for self-care.
I love using my homemade sugar scrub and try to use it about once a week. Please let me know what you think of this and if you decide to make it yourself! If you want to see more workouts like this please subscribe below for weekly emails. Thank you so much for checking out today’s post.

-
Best Back Workout
Hey Everyone!
Today, I’m sharing one of my back workouts with you!! I do these workouts about once a week. The single arm cable lat pull variation is definitely my favorite in this set. I love being able to see the difference it makes in my back, after a few months. I like to use the 10-15 pound weight for the first, 20-25 pound weight for the second, and 40-55 pound weight for the last workout on the cable machine.
I do three sets of the following:
Single Arm Cable Lat Pull Variation 10 Reps (Each Arm)
Low Position Cable Row 10 Reps
Close Grip Pulldowns 10 Reps
Here is a video of me doing these exercises so that you can see what they are if you are unfamiliar with them! When you do these exercises keep your movements slow and controlled. You will see results faster if you do this.
I hope you loved today’s workout! Let me know what you think in the comments below. If you want to see more workouts like this please subscribe below for weekly emails. Thank you so much for checking out today’s post.

-
Blissful Bai
Hi Everyone! Today, I am sharing with you one of my favorite beverages, Bai. It’s been a lifesaver for me to get some natural caffeine when I am trying to avoid coffee, energy drinks, and soda. I found this healthier alternative from my mom. They are about 10 calories and have only 1-2 grams of sugar per bottle. Which clearly wins when it comes to the sugary alternatives I mentioned above.
So what is in Bai?
They use the coffeefruit (the outside of a coffeebean) as their main ingredient. This used to be discarded by coffee bean farmers and would pollute the environment. The coffeefruit is actually loaded with antioxidants that can benefit us significantly, so it is the backbone of each Bai. Not only does this decrease waste, but it is actually benefiting coffeefruit communities as well. “Bai’s purchasing and use of the coffeefruit supports long-term economic opportunities for coffee producers in remote, relatively poor regions.”
Here is a video about coffeefruit by Bai.
They taste so good and they do not use harmful artificial sweeteners. “The answer lies in the combination of “smart sweeteners” — erythritol and stevia leaf extract— used in each flavor of Bai.” This keeps each Bai tasting sweet but not unhealthy. “There is one gram of sugar in each 8 oz. serving of Bai. Many sodas, juices and iced teas on the market today are loaded with sugar, with between 23 grams to 31 grams of processed sugar per serving.” I really love sweet drinks so being able to get that without all the sugar is a win win for me.
“Bai is also non-GMO, gluten free, soy free, BPA free, vegan, low glycemic and free of artificial preservatives.” They work very hard to keep their products as natural as possible.
“White tea is added to Bai for flavor, as a source of added antioxidants and for a gentle lift of nature’s caffeine to give Bai consumers a little extra energy as a healthier alternative to the many over-caffeinated, over-sugared drinks on the market.” I love being able to get in some healthy caffeine when I need it. Some days, I just need that extra energy to get through the day or through a long drive for work.
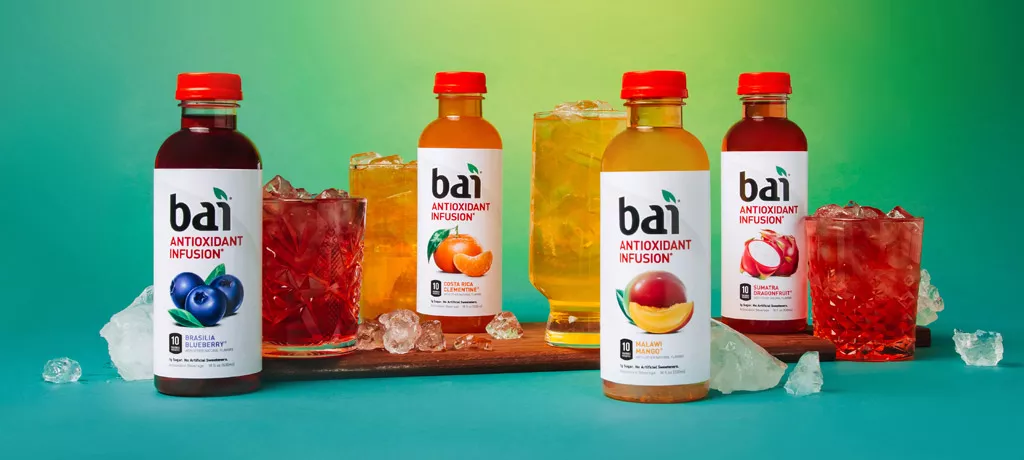
If you haven’t tried Bai before and you are drinking an unhealthy alternative regularly, I challenge you to give Bai a shot. These are some of my favorite go to drinks now. My favorite flavors are: Brasilia Blueberry, Costa Rica Clementine, Ipanema Pomegranate, Kula Watermelon, Panama Peach, Zambia Bing Cherry, Burundi Blueberry Lemonade, Lanai Blackberry Lemonade, São Paulo Strawberry Lemonade, Nariño Peach Tea, Rio Raspberry Tea, and Tanzania Lemonade Tea.
My absolute favorites are the lemonades!
Thank you so much for reading today. I hope you loved today’s post. Please let me know what you think in the comments below. Please subscribe for more helpful content.

-
Avocado Toast
Hey Everyone!
Today’s post is a recipe for something I have become absolutely obsessed with, avocado toast. It is perfect for when you are in a rush or just need something that is quick to make. I like to make it for breakfast or lunch because it’s simple and healthy. Plus it tastes so good!!
Ingredients:
2 Slices of Sourdough Bread
1 Tbsp Spray Butter
1 Avocado
1 tsp Everything But the Bagel Seasoning
1 tsp Garlic Salt
Recipe:
- Toast your slices of bread. (Either in the toaster or airfryer on reheat).
- While your bread is toasting cut your avocado into thin slices.
- When your bread is done toasting lightly spray each slice with spray butter. (An alternative is to spread garlic or chipotle aioli on the toast instead of using spray butter, it does however make it less healthy.)
- Season your buttered bread with the garlic salt.
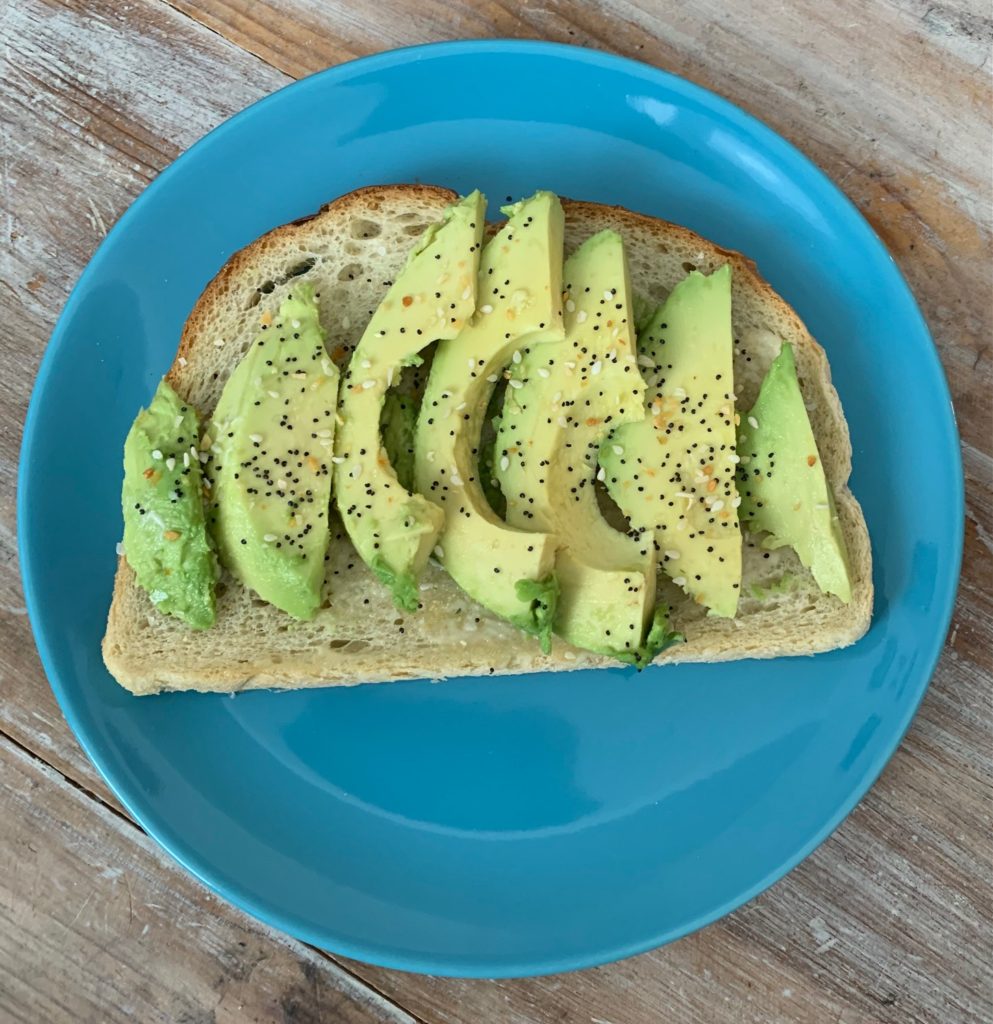
- Spread one half of the avocado on each slice of bread.
- Season the top with everything but the bagel seasoning.
- Enjoy.
I have been eating this at least twice a week for the last month. I am obsessed. I hope you love this recipe as much as I do. Please let me know in the comments below, if you do. If you are interested in more healthy recipes please subscribe below.

-
Preventing Sciatic Pain
Hi Everyone!
Today, I am sharing with you my best stretches to prevent sciatic pain. Havard Medical School states, “As many as 40% of people will get it during their life, and it becomes more frequent as you age.” Sciatic pain is something I have dealt with almost every year since I was 16. My sciatic pain tends to shoot down one of my legs. Mine usually flares up in the winter months, which I believe is due to the amount of time spent in the car driving to ski resorts. Sitting for long periods of time can cause flare ups.
Over the years, I have found what works best for me in preventing it from flaring up. I do these stretches with my stretching routine after each workout.
Pigeon Pose
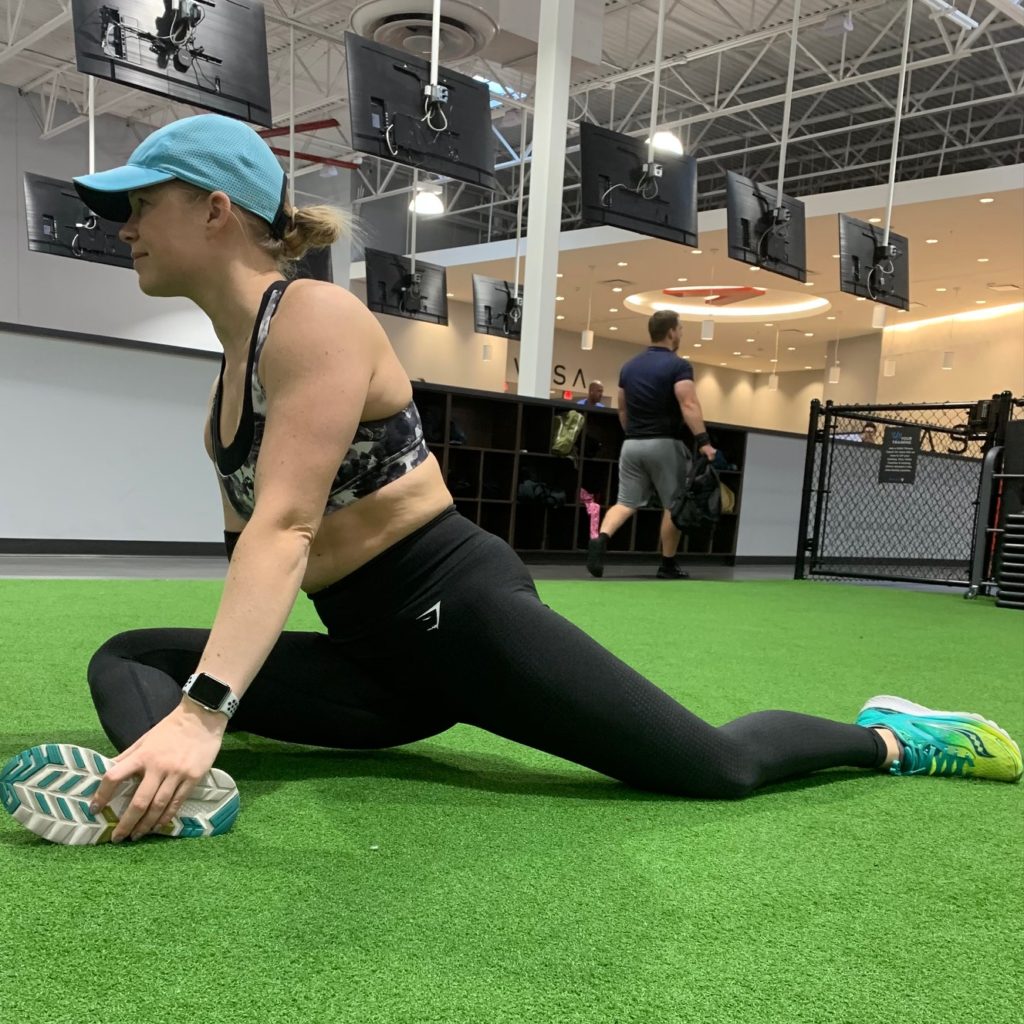
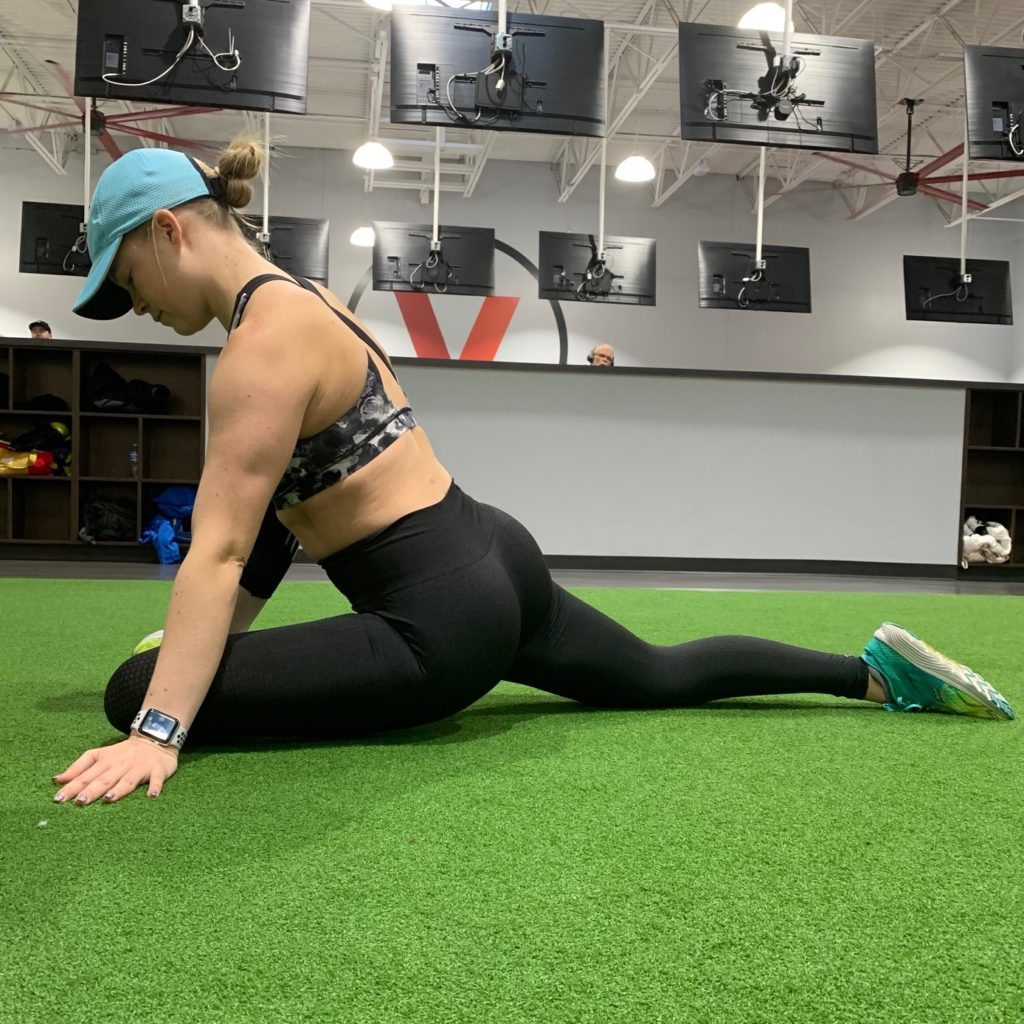
I make sure that my front leg is at about 90 degrees and that I am centered over my front leg for the best stretch. I really want to feel this on the side of my hip. Hold for 30 seconds and switch legs.
Seated Spinal Twist
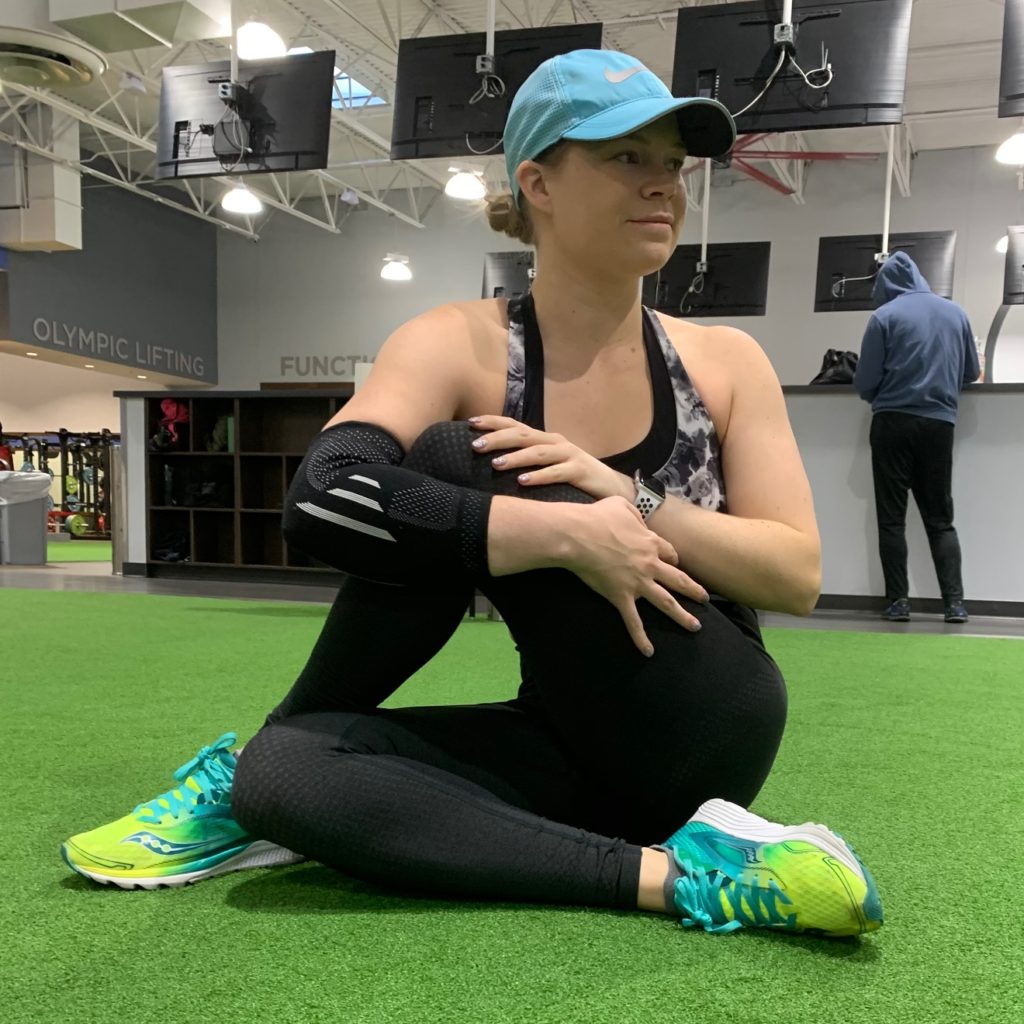
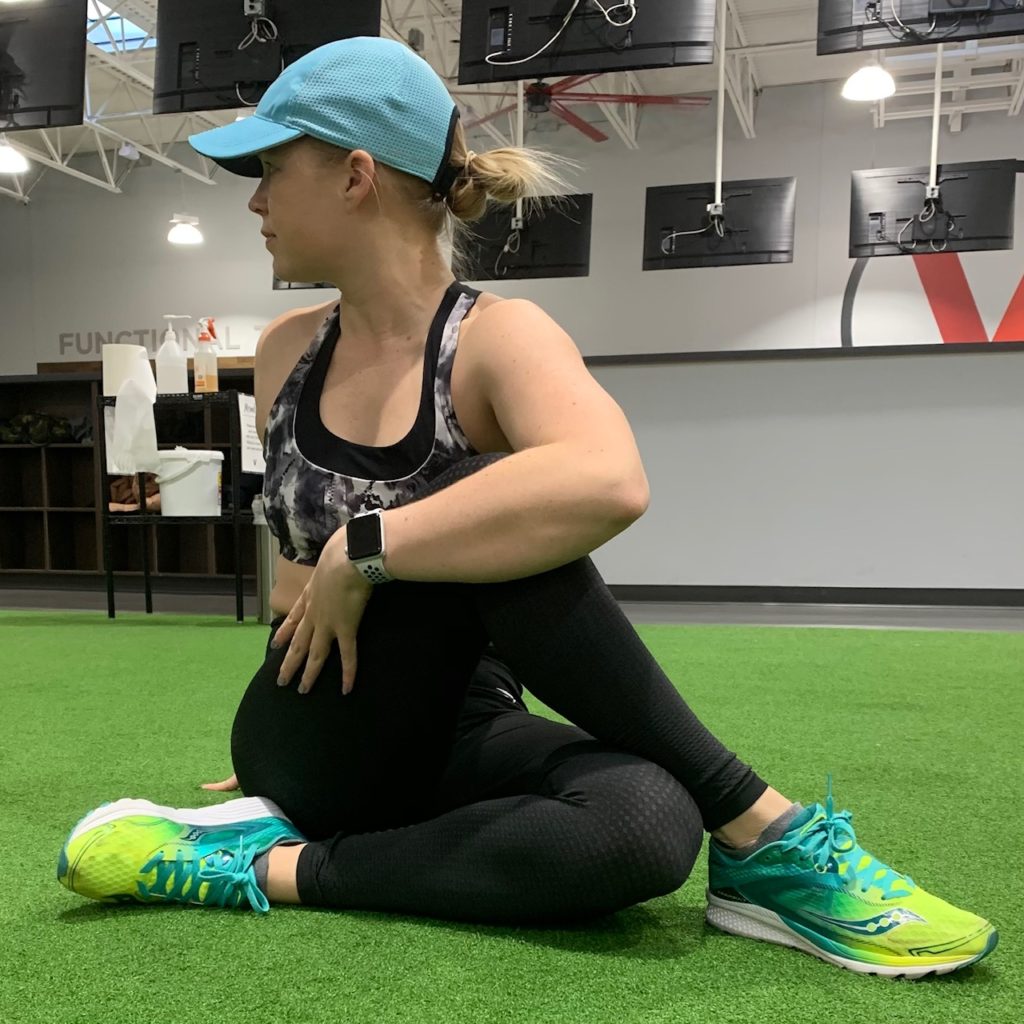
This one really stretches your piriformis muscle, which is usually the muscle that is pinching your sciatic nerve. Make sure that you are twisted toward the hip of your leg that is up. Hold for 30 seconds and switch legs.
Seated Figure 4
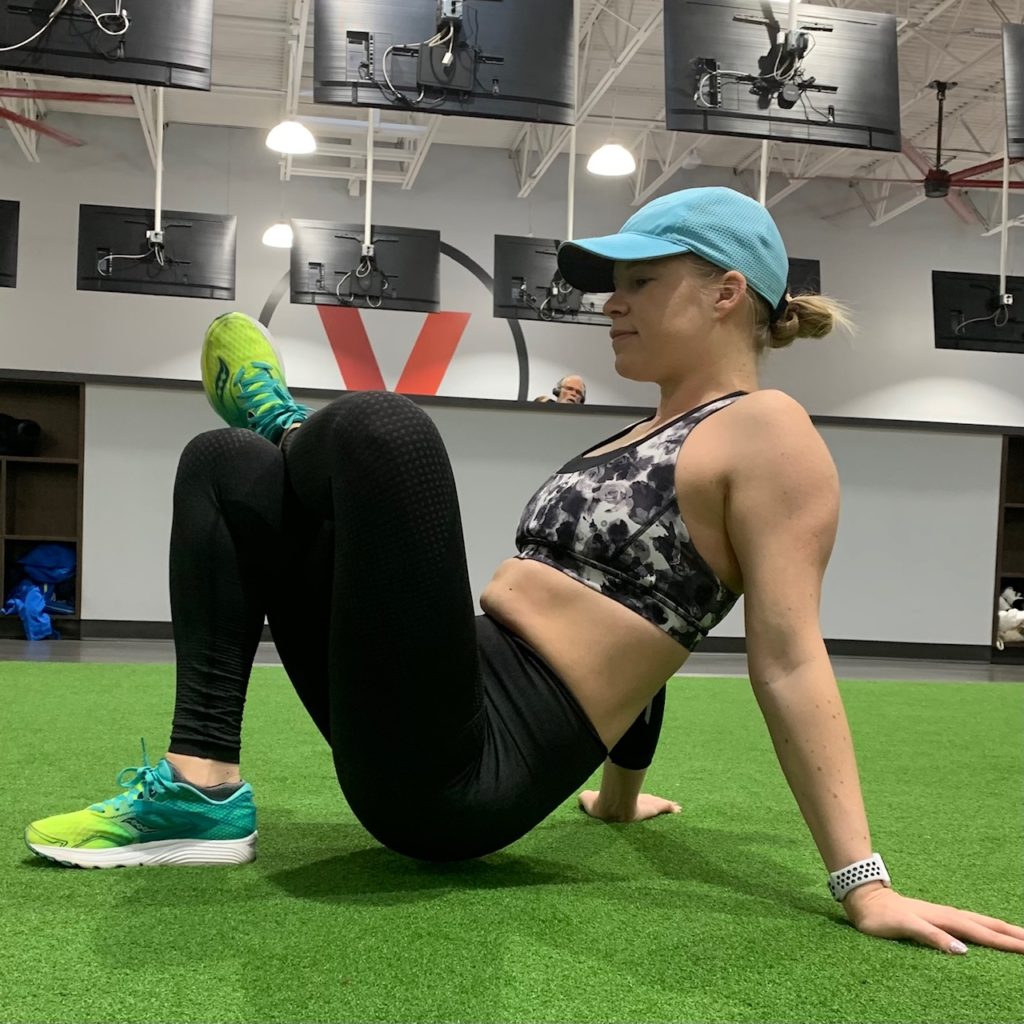
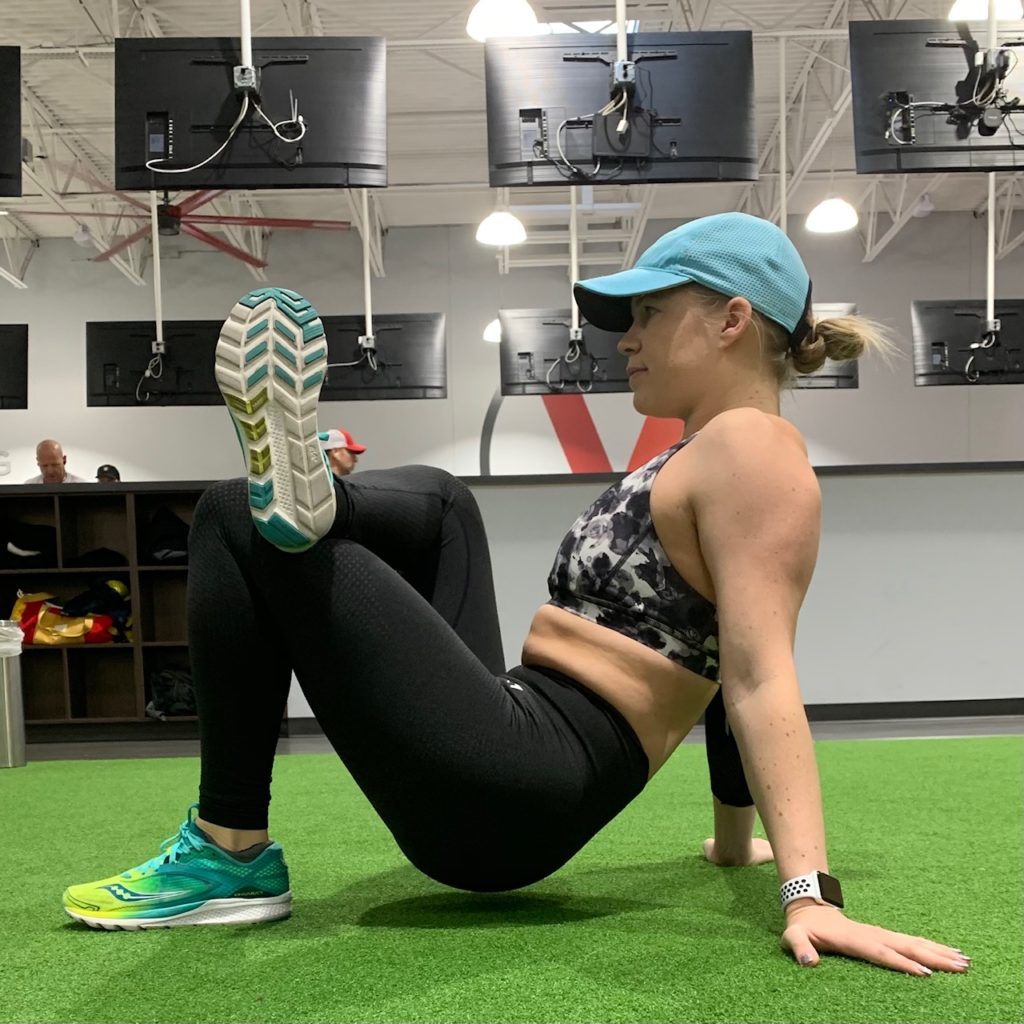
This stretch is to open your hips and can even help with low back pain. You can bring your leg as close to you as is comfortable. Sometimes I do this one in the car when we’ve been driving for a long time. Hold for 30 seconds and switch legs.
I really think these stretches help me to prevent sciatic pain. If your muscles get too tight in this area, there is always a chance that you can have a sciatica flare up. Let me know in the comments below if you have ever experienced sciatica and what you did to make it go away. I would love to hear about it.
Thank you for reading today’s post. Let me know what you think in the comments below.

-
Cable Triceps & Biceps
Hey Everyone!
Today, I’m sharing one of my arm workouts with you!! I do these workouts about once a week. You want to strengthen both your biceps and triceps to keep them even. You don’t want one to be a lot stronger than the other or it can cause mobility issues. You don’t have to work them on the same day, just make sure that you are focusing on both and not just one. I like to use the 20 to 25 pound weight on the cable machine for this workout.
I do three sets of the following:
Close Grip Cable Tricep Pushdowns 10 Reps
Cable Tricep Pushdown 21’s 21 Reps (7 focused on the top, 7 focused on the bottom, and 7 full movement)
Cable Bicep Curl 21’s 21 Reps (7 focused on the top, 7 focused on the bottom, and 7 full movement)
Here is a video of me doing these exercises so that you can see what they are if you are unfamiliar with them! When you do these exercises keep your movements slow and controlled. You will see results faster if you do this.
I hope you loved today’s workout! Let me know what you think in the comments below. If you want to see more workouts like this please subscribe below for weekly emails. Thank you so much for checking out today’s post.

-
Ultimate Gym Bag
Hey Everyone!
Today I am sharing my favorite gym bag with you!! I have been using this bag for over a year and a half and I still continue to love it. It’s been very durable and holds everything that I want to take with me to the gym! My last gym bag fell apart so I wanted to make sure that it would hold up well before I shared it with you. It also is pretty affordable so it won’t break the bank.
So what gym bag am I talking about? The FocusGear Ultimate Gym Bag 2.0.
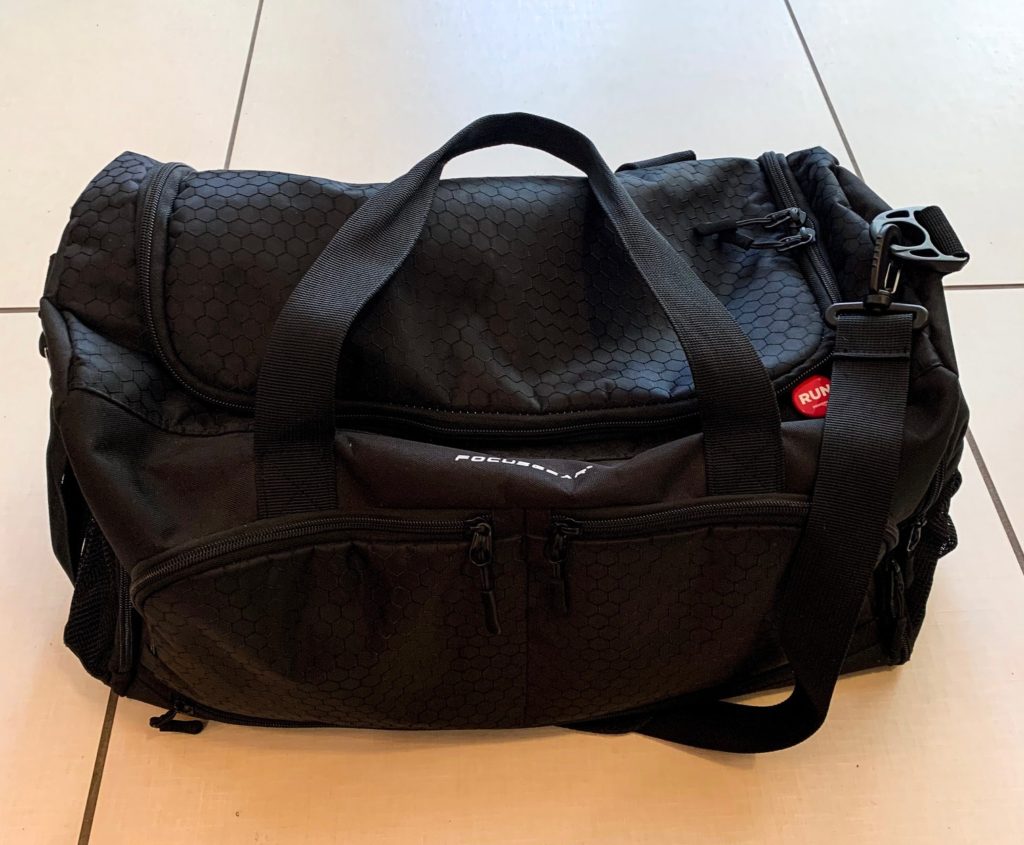
Why do I love this bag?
First, it’s got a ton of pockets so that you can keep your things organized! Second, it’s super durable. The straps are reinforced so they won’t come undone over time. Third, it has a special pocket for your shoes that’s water resistant. This is perfect for if you have to change out your shoes at the gym. If they are muddy or wet, it won’t get on your other things. Forth, it has another water resistant pocket on the bottom where you can store your swimwear if you like to swim at the gym, without getting your other things wet. I personally like to store my laptop in this pocket if I need to take it with me. Fifth, it has a “big mouth” opening on the top which makes it super easy to find all your things in the main pocket. Sixth, it has a weather resistant bottom to keep your things safe. Lastly seventh, it won’t break the bank!! It’s less than $30 with shipping!
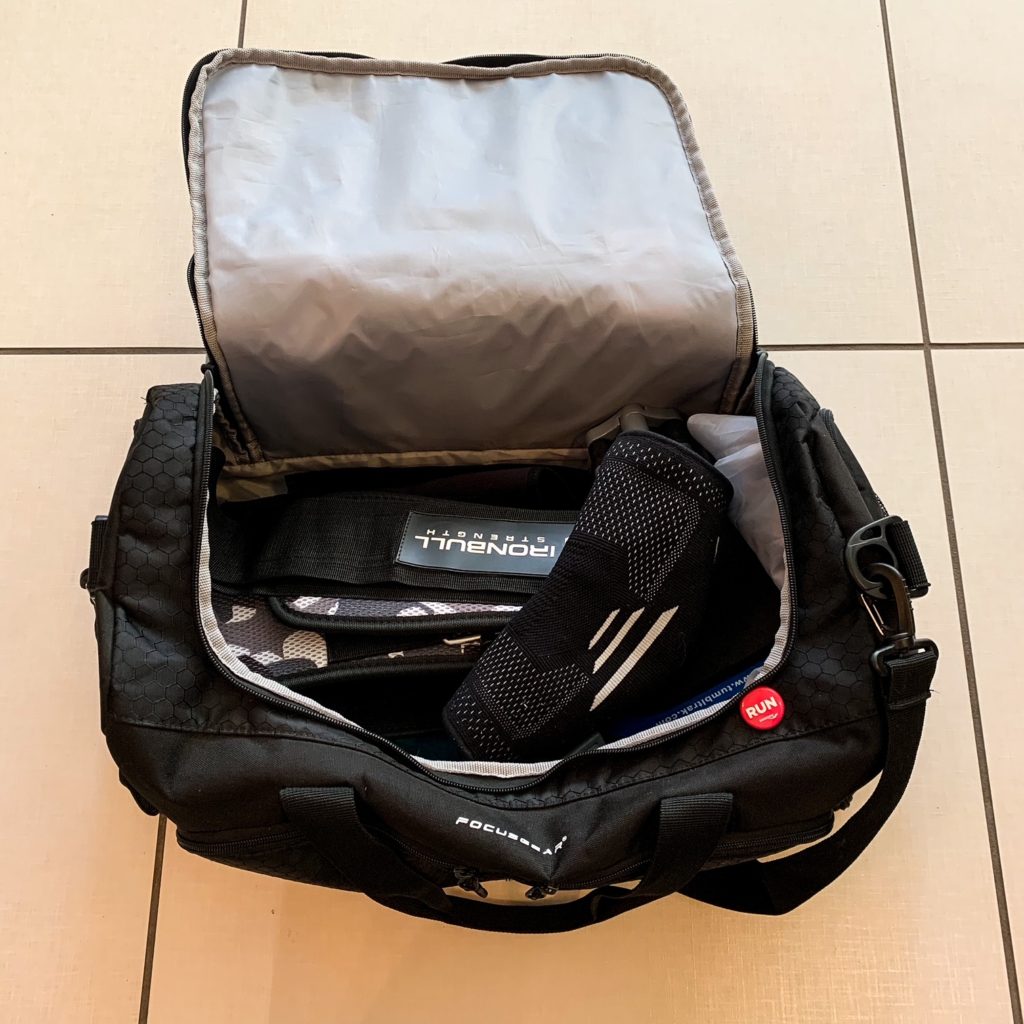
Where can you get this bag??
Thanks for reading, I hope you loved today’s post. Please let me know what you think in the comments below! If you love my content please subscribe!

-
Perfect Fall Pumpkin Muffins
Hi Everyone!! Today, I am sharing with you a delicious recipe for pumpkin muffins that are perfect for fall. I love making these as they are easy and they make your whole house smell really good. They also taste great even after sitting for several days (if you can make them last that long)! We love to have them for breakfast or as a desert (or both honestly).
Ingredients:
1 ¾ Cups All-Purpose Flour
1 Cup Sugar (Can substitute with Stevia Powder)
½ Cup Light Brown Sugar
2 tsp Ground Cinnamon
1 tsp Baking Soda
½ tsp Salt
¼ tsp Ground Cloves
¼ tsp Ground Nutmeg
2 Eggs
1 Can (15 oz) Pure Pumpkin
½ Cup Vegetable Oil (can substitute with coconut oil)
1 tsp Vanilla Extract
½ Cup Milk Chocolate Chips (optional)
Recipe:
- Preheat your oven to 375℉.
- Place paper liners into your muffin baking pan.
- In a large bowl, combine flour, sugar, brown sugar, cinnamon, baking soda, salt, cloves, and nutmeg. Whisk together, break up any clumps.
- In a small bowl, combine eggs, pumpkin, oil, and vanilla extract. Whisk together.
- Place both mixtures into your kitchenaid (or one bowl) and whisk together until well mixed. (Add chocolate chips, if desired).
- Fill each liner slightly below the top.
- Bake for 20 minutes.
- Enjoy!
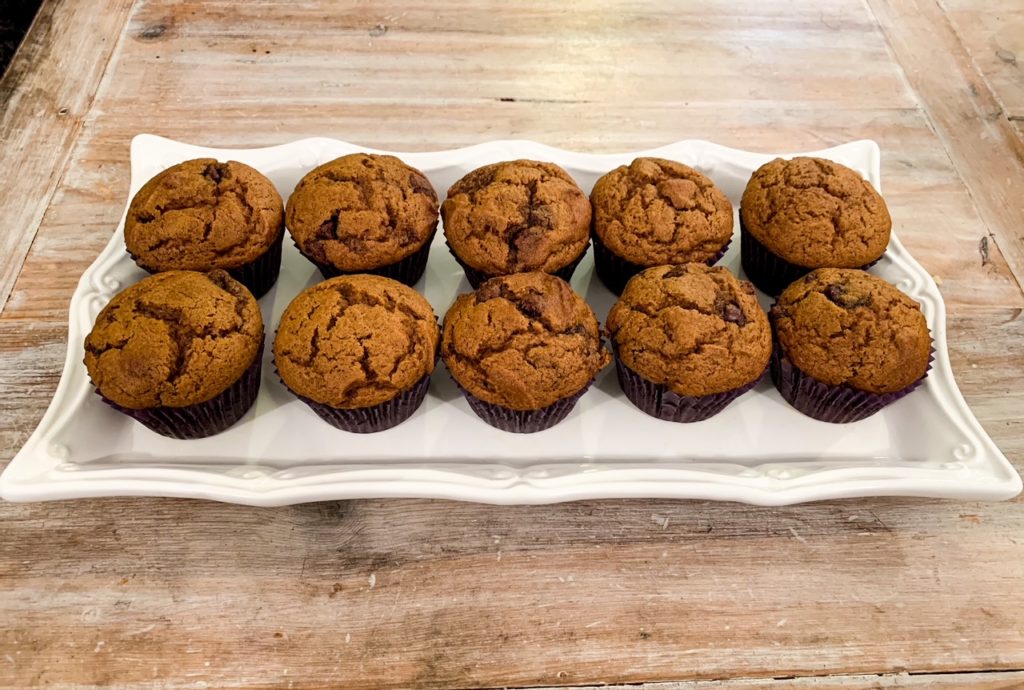
I usually get about 14 muffins per batch so you can adjust the recipe depending on how many you want! It usually takes me about 30 minutes from start to finish to make these. We absolutely love them and I think they are perfect with the fall weather. They taste just like pumpkin bread without having to dirty a knife every time you want them.
I hope you loved today’s recipe. Let me know what you think in the comments below! If you love my content please don’t forget to subscribe below!

