-
Southwest Turkey & Rice Bowl
Hi Everyone!
Today, I am sharing a delicious recipe for a southwest turkey and rice bowl. I got this idea from Pinterest from thelifejolie.com. This recipe is another great one to use for meal prep.
Ingredients (6 Servings)
1 Tbsp Cooking Oil (I used spray vegetable)
½ Cup Diced Onion
2 Minced Garlic Cloves
1 Pound Ground Turkey
¼ tsp Salt
¼ tsp Pepper
1 tsp Chili Powder
½ tsp Cumin
1 tsp Dried Cilantro
1 Can (10 Oz) Rotel Tomatoes and Green Chilies
1 Can (4 Oz) Mild Diced Green Chilies
1 Can (15 Oz) Pinto Beans (rinsed)
1 Cup Frozen Corn
2 Cups Cooked Jasmine Rice
Add-ins Optional:
¼ Cup Cheddar Cheese
Scallions (to taste)
Lime Juice (to taste)
Tortilla Chips
Recipe
- Heat a large skillet on medium-high heat. Add 1 Tbsp of cooking oil.
- Sauté onion for 2-3 minutes stirring regularly.
- Add garlic and continue to stir for 30 seconds.
- Add ground turkey, breaking it up and sautéing until browned. This should be about 5 minutes.
- Drain excess liquid. Add in salt, pepper, chili powder, cumin, and cilantro. Continue to cook for 2 minutes.
- Add in Rotel, green chilies, pinto beans, corn, and cooked rice. (If your skillet is not large enough, you can add the mixture to the rice after mixing together).
- Stir for 5 minutes to combine and heat through.
- Enjoy and add the optional add-ins if desired.

Shane and I have been loving this meal. It is a switch up of our normal turkey bowls. It still has a great source of protein and veggies. It is very filling and is reheatable. I hope you like this meal prep idea as much as we do. Please let me know in the comments below, if you do. If you are interested in more healthy recipes please subscribe below.

You May Also Like
The BEST Protein Shake
-
Sauna Sessions
Hi Everyone!
Today, I am going to talk about the benefits of using a sauna regularly. This is something I try to do at least twice a week for 10-15 minutes each time. I like to use the sauna after my stretching after working out. I have found it to be very helpful and I look forward to it at the end of my gym session.
Benefits of using a sauna:
- Improves overall health
- Helps to flush toxins
- Aid in muscle recovery
- Helps to relieve stress
Now, I am going to go into detail about each of these benefits. According to JAMA, regular sauna use (four times a week for 15 minutes) can reduce your mortality rate by 40%. The sauna can lead to a healthier brain. There have been studies that show regular use of a sauna can reduce your risk for dementia and alzheimers. Heat also helps to increase the speed as to which white blood cells are released in our bodies, this can help us to fight illnesses. Saunas can help to cleanse your skin as well. Sweating helps to rinse the bacteria out of the epidermal layer and sweat ducts. Due to the heat of the sauna, your body begins to deep sweat, this can help your body to rid it of many toxins. These toxins include: lead, copper, zinc, nickel, and even mercury. The sauna can help you by relaxing your muscles and improving your circulation. This happens because your vessels dilate which supplies your muscles with more oxygen. This also helps to speed up your muscle healing process. Sauna’s help to regulate your cortisol in your system, lowering cortisol and increasing serotonin.
I personally love using the sauna and I have seen a lot of the benefits above. I was so excited when the sauna opened back up at my gym this year. I definitely missed it. I feel when I use it after working out that my recovery is better and faster. I feel better overall.
If you are thinking about trying out the sauna for the first time, listen to your body. I would start by doing five minutes. If you feel dizzy or nausea, get out of the sauna. If you are dehydrated, the sauna can make that worse. Make sure that you are well hydrated before doing a sauna session. Do not stay in the sauna longer than twenty minutes.
Thank you for taking the time out of your day to read my blog. It means a lot to me. Please let me know what you think about this post and what you are interested in seeing in the future in the comments below. If you love my blog and are interested in seeing more content, please subscribe below.
-
Pineapple Teriyaki Chicken
Hey Everyone!
Today’s post is a recipe for pineapple teriyaki chicken. It’s pretty easy and fast to make. I make it start to finish in about 45 minutes. I have been testing out some new recipes to help with meal prep that I plan to start soon. Shane and I have been really busy lately and we haven’t been eating as well as we should because of that. This is one that we have enjoyed.
Ingredients:
1 Tbsp Cornstarch
1 Tbsp Water
¾ Cup Teriyaki Marinade & Sauce
1 Clove Garlic
1 tsp Ginger
2 Chicken Breasts (Cut into bite-sized pieces)
1 Cup Pineapple Chunks (Fresh or Canned)
1 ½ Cup of Uncooked Rice

Recipe:
- Preheat your oven to 400 degrees fahrenheit.
- Mix your cornstarch and water in a small bowl. Add this mixture, along with the teriyaki sauce, garlic, and ginger into a small saucepan over low heat. Whisk for a minute and then remove from heat and set aside. Sauce should thicken.
- Add your chicken and pineapple into a pan. (I like to use the Pyrex 8”X8” I have linked it below) Pour your sauce over and stir to coat all sides of your chicken and pineapple.
- Bake for 30-35 minutes. Ensure chicken is cooked through.
- Cook rice according to the package.
- Add chicken and pineapple mixture to rice.
- Enjoy.
I have loved discovering more recipes that can be used for meal prep. I hope you like this recipe as much as I do. Please let me know in the comments below, if you do. If you are interested in more healthy recipes please subscribe below.
You May Also Like
The BEST Protein Shake
-
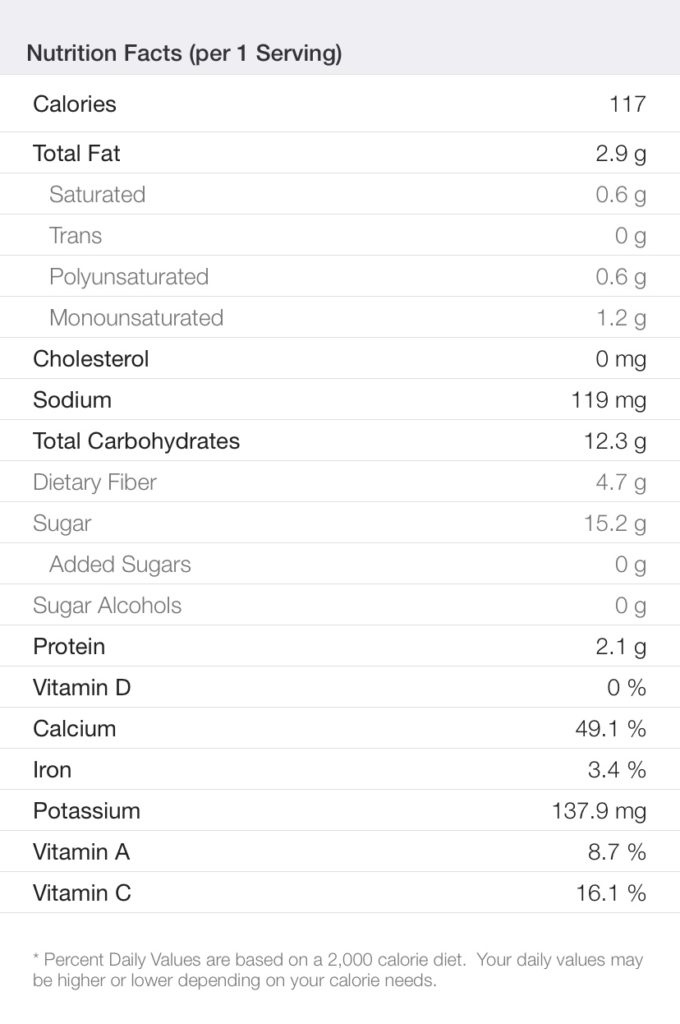
Refreshing Raspberry Lemon Smoothie
Hi Everyone!
Today, I am sharing one of my favorite smoothie recipes! It is for a refreshing raspberry lemon smoothie! It only has five ingredients so it is very easy to make. I really love it for the summertime!
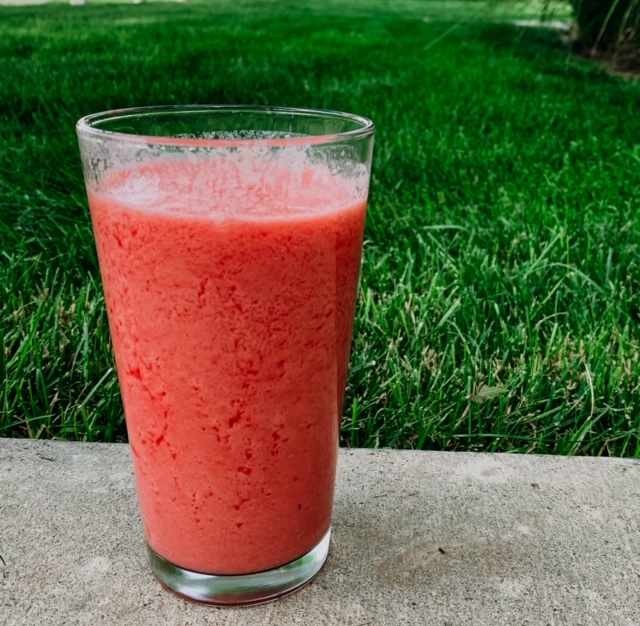
Ingredients:
1/2 Cup Lemon Juice (Fresh if possible)
1 Cup Frozen Raspberries
2 Tbsp Stevia
1 1/2 Cup Almond Milk
1 Cup Ice Cubes
Instructions:
- Combine all ingredients in a blender and select the smoothie button. Pour into cup and enjoy!
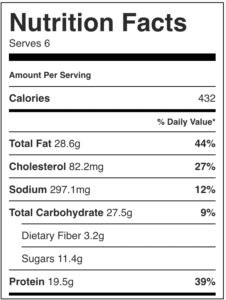
I hope you love this recipe as much as I do. I have listed the nutrition facts below! Let me know what you think in the comments below and if you love this post, please subscribe below! Thanks for reading.
You May Also Like
The BEST Protein Shake
-
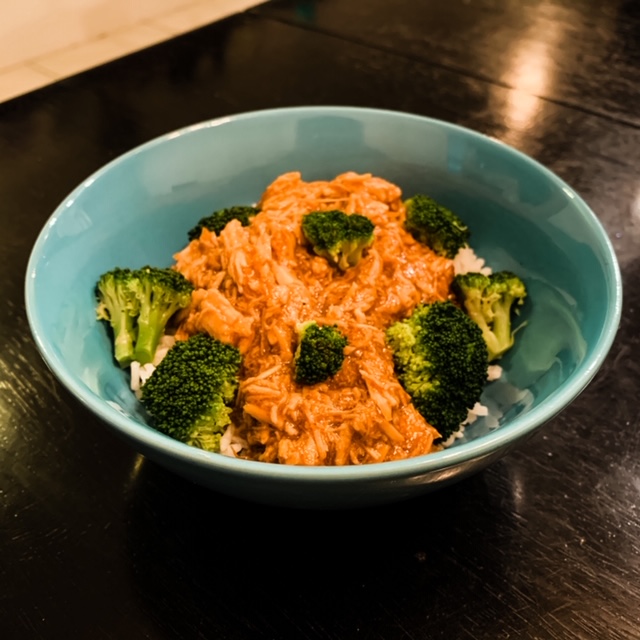
Honey Garlic Shredded Chicken
Hey Everybody!
Today’s recipe is one for honey garlic chicken. I love this recipe because it is tastes so good and it’s fairly easy to make. I got the idea for this recipe partially from Pinterest but have altered it over time to make it healthier. This is another recipe for the Instant Pot.
This recipe generally takes only about 30 minutes from start to finish.
Ingredients
1 lb. Chicken Breast (thawed)
½ Cup Honey
2 Tbsp. Soy Sauce
3 tsp. Brown Sugar
1 tsp. Onion Powder
¼ Cup Ketchup
2 Tbsp. Vegetable Oil
4 Minced Garlic Cloves
3 tsp. Cornstarch
¼ Cup Water
Additional: Jasmine Rice and Broccoli
Instructions
- Set you raw chicken breasts in the bottom of your Instant Pot and season with salt and pepper.
- In a separate bowl, combine honey, soy sauce, brown sugar, onion powder, ketchup, vegetable oil, and garlic cloves. Mix well and pour over the chicken.
- Put your Instant Pot lid on and set your Instant Pot to the Meat Setting on High Pressure for 15 minutes.
- While your chicken is cooking, start your jasmine rice and steam your broccoli.
- Mix your water and cornstarch together.
- Once the 15 minutes is up, quick release. Remove your chicken from the Instant Pot and shred it.
- Add your cornstarch and water mixture to your Instant Pot and change the setting to Sauté. Mix until slightly thickened. (About 3-5 Minutes)
- Return your chicken to the Instant Pot and mix with the sauce. Serve with rice and broccoli.
I have learned a few tips while making this recipe that I would love to share with you. Shred the chicken with your KitchenAid if you have one, it’ll make your life so much easier. If you have someone to help you, one should shred the chicken, while the other is mixing the sauce. Don’t use frozen chicken, it won’t taste nearly as good and may even burn (speaking from experience). If you like a lot of sauce or want to put it on your broccoli you can double all of the sauce ingredients.
I really enjoy this recipe and I hope you do too. Let me know what you think about this recipe in the comments below. If you love this please subscribe as well!
[email-subscribers-form id=”1″]
You May Also Like
The BEST Protein Shake
-
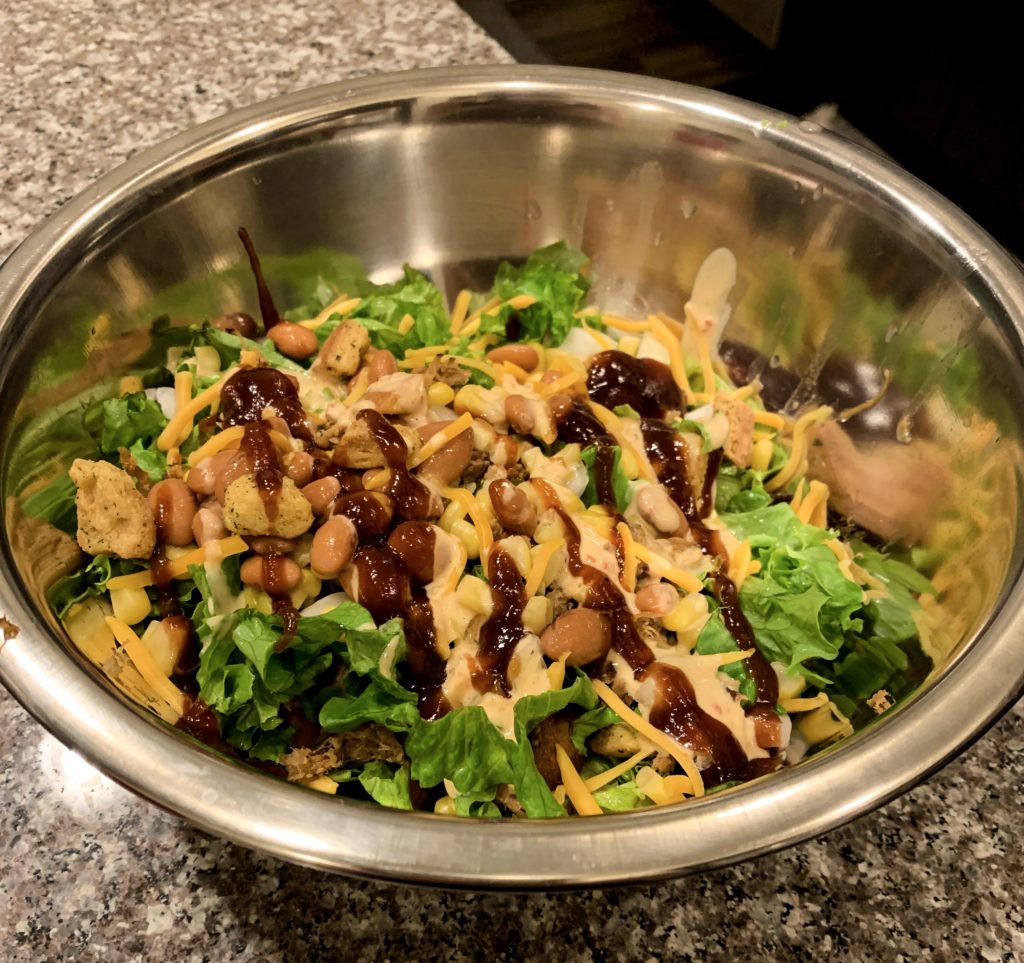
Scrumptious Salad
Hi Everyone!
Today’s post is about my favorite salad of all time. This is my go-to salad! It reminds me of the Chipotle Glazed Pork Salad from Zuppas. The ingredients are listed below for one serving of salad.
Ingredients
1/3 Head Green Leaf Lettuce
1/6 Package Pork Carnitas
¼ Can Sweet Corn
¼ Can Pinto Beans
8 Croutons
1/8 Red Onion
10 Cherry Tomatoes
¼ Avocado
1 Tablespoon Chipotle Ranch
1 Tablespoon Barbeque Sauce
1/8 Cup Cheddar Cheese
Directions
- Heat up the meat in the microwave according to the directions on the box.
- Get two pans out and start heating your sweet corn and pinto beans on medium-low.
- When the meat is finished heating, remove from the packaging and place into the kitchen aid with 2 Tablespoons of Barbeque sauce, lock and mix at a three for one minute. If you do not have a kitchen aid, you can shred the meat and mix it with the sauce in a bowl.
- Next cut your head of lettuce.
- Next dice your red onion. (I keep a diced onion in a Ziploc baggie in my fridge).
- Next cut your cherry tomatoes in half.
- Next dice your avocado.
- Add the above amounts of ingredients into a large bowl and toss.
- When finished, drizzle your remaining barbeque sauce and chipotle ranch over the mixture.
- Enjoy!!
I am obsessed with this salad. If you ask anyone who knows me well if I’ve always loved salads, they will tell you definitely not. I just recently got into eating salads within the last two years. I could seriously eat this one every day if I could!
Let me know what you think about this recipe in the comments below!! Subscribe to see all of the yummy recipes I post!
[email-subscribers-form id=”1″]
You May Also Like
The BEST Protein Shake
-
All-Natural Deodorant
Hey Everybody!
Today I am getting pretty personal with my sweating problem and what I do to fix it.
My mom actually introduced me to an all-natural deodorant while we were on our trip to California. I couldn’t be more grateful. It’s called Kopari.
Deodorant is something that is pretty important to me because I myself sweat a ton! I am constantly putting deodorant on. I wake up, apply deodorant and head straight to the gym. When I am done there, I head home shower off, then reapply.
When we put deodorant on, we expect it to work. How many times have you been at the gym wondering what that awful smell was, and it turned out to be you? I unfortunately have been there. Then you want no one to get anywhere near you… With Kopari, you won’t have to worry about that anymore. Kopari states, “Our 100% plant based active works with your body’s natural functions to aid in odor reduction.”
I tried this product out for the first time when I went to Disneyland in mid-August. To say it was hot would be an understatement. I thought I would be so stinky and sweaty. To my surprise, it completely did its job and I was neither.
What about those horrible white marks on your shirts? “This aluminum-free deodorant glides on clear. Never sticky, always awesome, it’ll outlast your longest days and leave you smelling like fresh coconut milk.” I have yet to see a mark on any of my clothes.

How many times have you been in the shower trying to get off your last application of deodorant with no such luck? Or worse your armpits are tacky feeling that won’t come off with any amount of soap and scrubbing? Personally, I think that’s disgusting. Luckily with Kopari, since they only use natural ingredients, this never seems to happen anymore.
Okay, last but definitely not least, what is even in your deodorant? Did you know some ingredients in deodorant can actually increase your risk for cancer? Parabens have been found in normal deodorant and can wreak havoc on your body! Most also have aluminum, which may not seem too bad because it makes your sweat less. This is because it actually clogs your pores up and prevents you from sweating. Our bodies are meant to sweat to rid ourselves of toxins, by clogging your pores you are trapping them within. I know this is boring so I will stop here. These are seriously only TWO ingredients out of many that are absolutely terrible for you that you are applying under your arms day in and day out.
Kopari’s deodorant is “Dermatologist-Tested, Non-irritating, Non-Allergenic, Safe for Sensitive Skin, No Aluminum, No Baking Soda, No Parabens, No Silicone, No Phthalates and No Kidding.” I have been nothing short of impressed with this product. They offer a 100% satisfaction guarantee. It is all made in the USA. The thing I find most impressive though is that you can use any of their products while you are pregnant! How many companies can say that?

I have a special coupon for you guys! If you follow the link below you can get $10 off your purchase of $25 or more!
https://www.talkable.com/x/Dj78GI
I really hope you loved today’s post. This is something I am really passionate about! Please let me know what you think in the comments below. You can also subscribe below to stay updated each week with new content. Thanks for visiting!
[email-subscribers-form id=”1″]
-
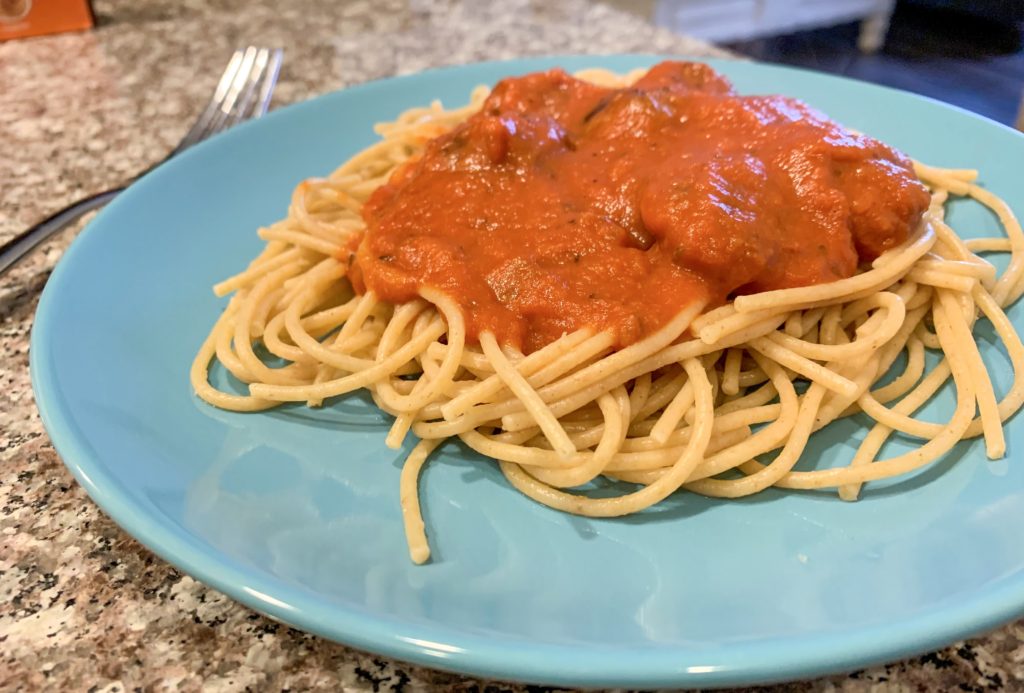
Smart Spaghetti
Hey Everybody!
Today’s meal is a healthy version of spaghetti. It is one of my easiest meals that I make and it is also Shane’s favorite, so it’s a go to for us. We eat this at least once a week.
Ingredients
½ Box of Ronzoni 100% Whole Grain Spaghetti Noodles
1 Jar of Kroger Parmesan & Romano Pasta Sauce
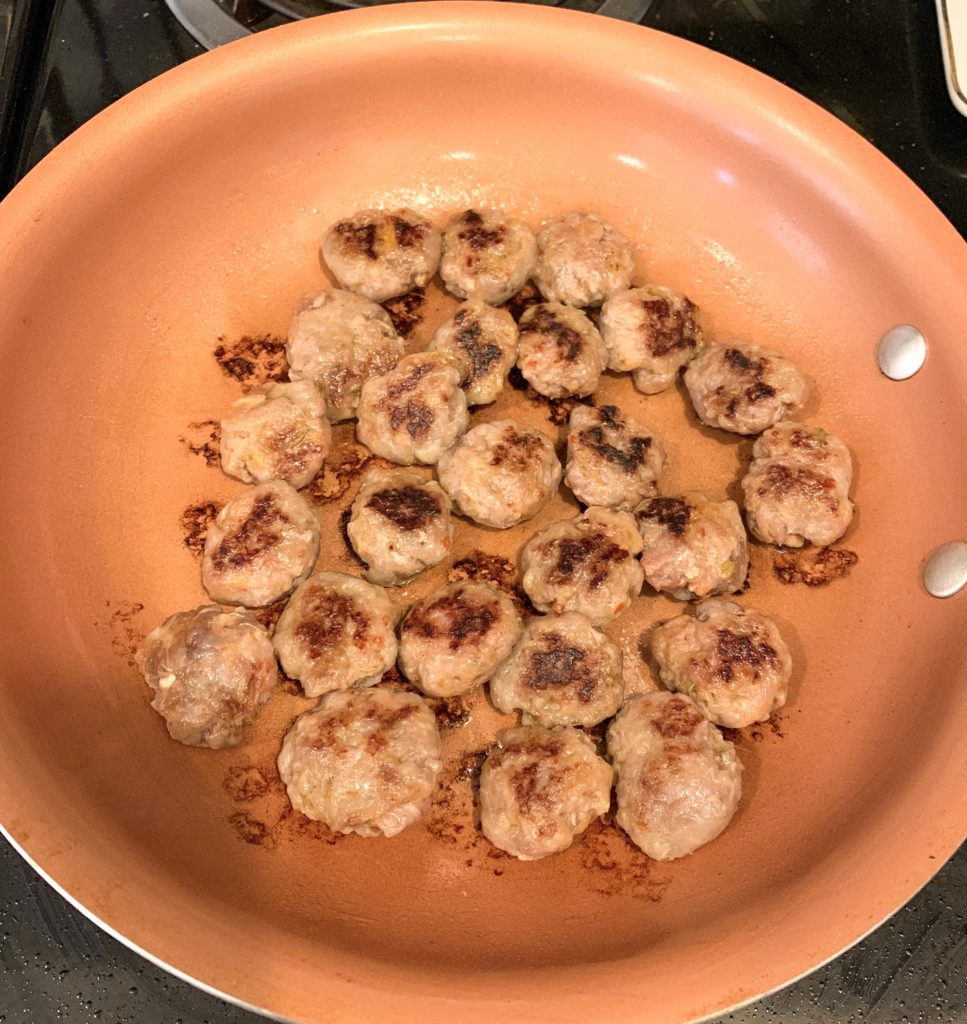
2 Italian Sausages (I like Mild)
Recipe
1. Heat up a frying pan on medium heat and another medium saucepan halfway filled with water on high.
2. While these are heating, decase your Italian sausages and make them into small patties.
3. When you are finished, put them into the frying pan, so they are all laying flat next to each other.
4. The water should be boiling in the saucepan by now so add half of your package of noodles, by breaking them in half. Dash a small amount of salt into the water (to prevent sticky noodles).
5. Start the timer for 10 minutes. Stir your noodles occasionally throughout this time.
6. Your sausages should be about ready to flip over, flip one over with a fork to make sure it has cooked to your liking, then flip the rest.
7. Once all of your sausages are cooked on both sides, I put mine into a small bowl and set it aside.
8. Drain your grease from the frying pan and bring the pan back to the heat lowering it to medium-low.
9. Add your pasta sauce to the frying pan and stir occasionally.
10. Drain your noodles when the timer goes off.
11. Add your sausage back to the frying pan into the sauce.
12. Once your sauce has heated to your liking you are ready to eat.
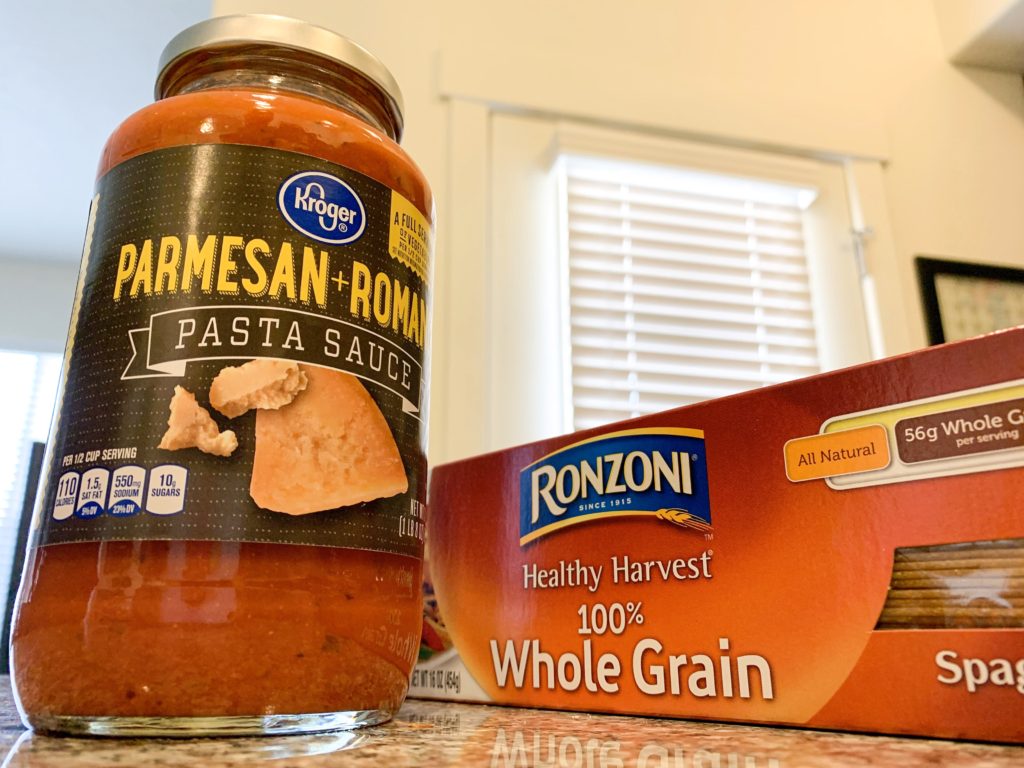
I absolutely love that this recipe only has three ingredients. It makes it very easy to prepare and to shop for. We also almost always have all of the ingredients on hand. I like to buy in bulk so that we have a little bit of a storage just in case. I also buy multiple packages of Italian sausage at the same time. When I get home I decase all of them and put them in freezer bags with two in each one. I just thaw them in the fridge each day we have this for dinner. It makes this meal very convenient.
Let me know what you think about this meal in the comments below. If you love this please subscribe as well!
[email-subscribers-form id=”1″]
You May Also Like
The BEST Protein Shake
-
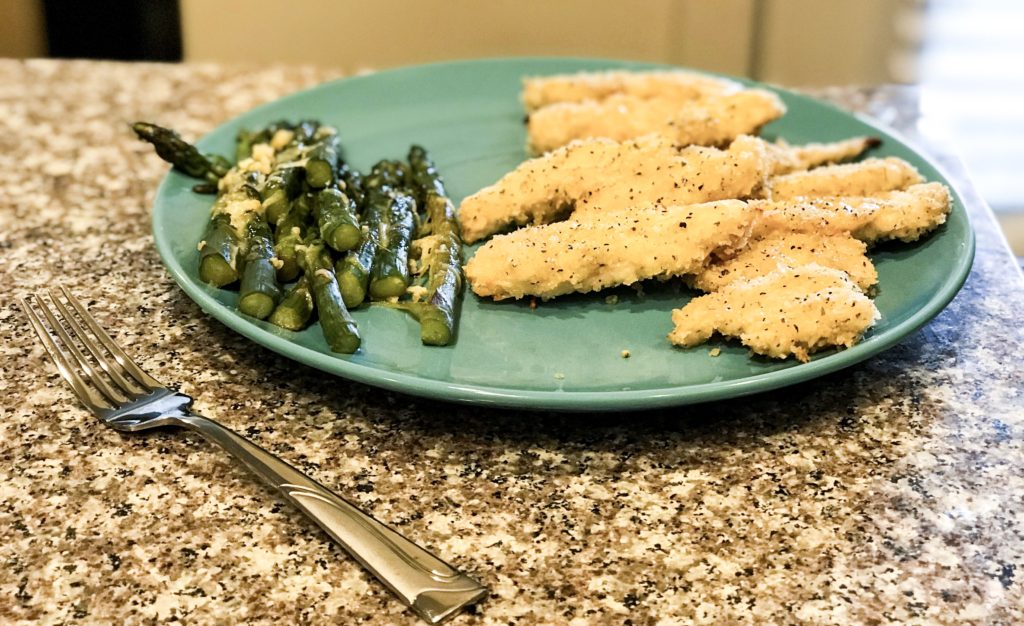
Mouthwatering Lemon Parmesan Chicken and Asparagus
Hey Everybody!
Today’s recipe is one for mouthwatering lemon parmesan chicken and asparagus. I am not kidding you; my mouth is literally watering as I type this. This meal is so delicious, it leaves you constantly thinking about when you can have it next! As I have mentioned before, I am known to be a picky eater so getting those veggies in is so tough for me. I have learned to love asparagus because of this meal!
I got this recipe from one of my good friend’s Lars Sundwell.
He got the recipe from Chelsea’s Messy Apron, though they call it one pan lemon parmesan chicken and asparagus. I think that title is misleading as this uses many items in the kitchen in order to prepare. (Though it is well worth it every time)
This recipe generally takes about 40 minutes from start to finish.
Ingredients
1 ½ pounds boneless skinless chicken breasts or tenders
1/3 cup flour
1 cup panko (found on the Asian Cooking Aisle)
1 cup parmesan cheese separated
1 teaspoon dried parsley
1/2 teaspoon garlic powder
3-4 lemons
1 tablespoon minced garlic
8 tablespoons melted butter separated
1 tablespoon lemon pepper seasoning
1 pound asparagus
3 tablespoons olive oil
3 tablespoons honey
Optional: fresh parsley, 1 lemon for topping
Instructions
- Preheat the oven to 400 degrees F. Line a large sheet pan with parchment paper and set aside.
- Grab three bowls. Add the flour to one bowl.
- Combine panko, 1/2 cup freshly grated parmesan cheese, dried parsley, garlic powder, about 1/2 teaspoon each of salt and pepper. Stir.
- In the final bowl, add 1-2 teaspoons lemon zest, 4-5 tablespoons lemon juice (depending on lemon flavor intensity desired), minced garlic, and 5 tablespoons melted butter. Stir. Remove 4 tablespoons of this mixture and set aside.
- Slice chicken breasts to the size of tenders (about 1 and 1/4th inch strips) or use chicken tenders.
- Coat in flour, heavily dredge in garlic lemon mixture, and then coat in the Parmesan panko mixture.
- Place on prepared sheet pan. Use any remaining Parmesan panko mixture and sprinkle over tenders. Sprinkle lemon pepper seasoning over the tenders (I use Mrs. Dash lemon pepper)
- Bake in preheated oven for 10 minutes and remove.
- Flip the tenders to the other side.
- Place the asparagus next to the tenders and drizzle the reserved lemon butter sauce. Sprinkle remaining 1/2 cup Parmesan cheese over the asparagus and toss with tongs.
- If desired place lemon slices over the chicken (optional)
- Return to the oven and bake for another 10-12 minutes or until the internal temperature of the chicken has reached 165 degrees F.
- Meanwhile, whisk remaining 3 tablespoons melted butter, 3 tablespoons lemon juice, 1-2 teaspoons lemon zest, 3 tablespoons olive oil, and 3 tablespoons honey in a small bowl. Add some pepper and parsley if desired.
- Remove from the oven and top with the honey lemon mixture and fresh parsley if desired and enjoy immediately.
- Do not top chicken breasts with the honey lemon mixture unless eating immediately and aren’t planning on having leftovers since it will make it soggy.
If you want to visit the original site go to: https://www.chelseasmessyapron.com/one-pan-lemon-parmesan-chicken-and-asparagus-video/
They even have a printable version of the recipe!
A few things that I have learned through making this recipe several times is that I like to steam my asparagus before baking it in the oven, if you forgot to get the lemons at the store it’s not the end of the world lemon juice works just fine, if you are cooking with your husband in the room make sure he knows that you set extra sauce to the side that you will be using (mine thought it was just another dirty dish and washed it down the drain lol).
Let me know what you think about this recipe in the comments below. If you love this please subscribe as well! You have got to try this one out. You will not be disappointed.
[email-subscribers-form id=”1″]
You May Also Like
The BEST Protein Shake
-
Challenging Chest Workout
Hey Everybody!!
Today’s workout is all about working out your chest! This workout is with free weights and an adjustable bench, although you could use a yoga ball in place of the bench if one is not available. I like to do these around 1-2 times a week, as it fits in my workout regimen. I love that with this workout you can change it to whatever skill level you are. You could use 2.5 pounds to 150! I like to change it up based on how I am feeling that day.
Do 4 sets of the following:
10 Incline Dumbbell Press
10 Incline Bench Dumbbell Fly
10 Flat Bench Dumbbell Press
10 Barbell Pullover
I have included a video below so you can see what each of these looks like.
If you loved today’s workout please subscribe below and leave a comment. I love hearing what all of you have to say. I would really appreciate it!
[email-subscribers-form id=”1″]
You May Also Like

Quick HIIT Treadmill Workout