-
Southwest Turkey & Rice Bowl
Hi Everyone!
Today, I am sharing a delicious recipe for a southwest turkey and rice bowl. I got this idea from Pinterest from thelifejolie.com. This recipe is another great one to use for meal prep.
Ingredients (6 Servings)
1 Tbsp Cooking Oil (I used spray vegetable)
½ Cup Diced Onion
2 Minced Garlic Cloves
1 Pound Ground Turkey
¼ tsp Salt
¼ tsp Pepper
1 tsp Chili Powder
½ tsp Cumin
1 tsp Dried Cilantro
1 Can (10 Oz) Rotel Tomatoes and Green Chilies
1 Can (4 Oz) Mild Diced Green Chilies
1 Can (15 Oz) Pinto Beans (rinsed)
1 Cup Frozen Corn
2 Cups Cooked Jasmine Rice
Add-ins Optional:
¼ Cup Cheddar Cheese
Scallions (to taste)
Lime Juice (to taste)
Tortilla Chips
Recipe
- Heat a large skillet on medium-high heat. Add 1 Tbsp of cooking oil.
- Sauté onion for 2-3 minutes stirring regularly.
- Add garlic and continue to stir for 30 seconds.
- Add ground turkey, breaking it up and sautéing until browned. This should be about 5 minutes.
- Drain excess liquid. Add in salt, pepper, chili powder, cumin, and cilantro. Continue to cook for 2 minutes.
- Add in Rotel, green chilies, pinto beans, corn, and cooked rice. (If your skillet is not large enough, you can add the mixture to the rice after mixing together).
- Stir for 5 minutes to combine and heat through.
- Enjoy and add the optional add-ins if desired.

Shane and I have been loving this meal. It is a switch up of our normal turkey bowls. It still has a great source of protein and veggies. It is very filling and is reheatable. I hope you like this meal prep idea as much as we do. Please let me know in the comments below, if you do. If you are interested in more healthy recipes please subscribe below.

You May Also Like
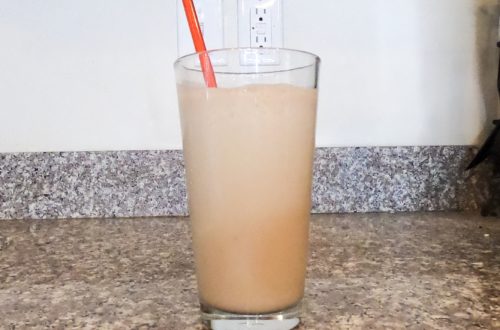
The BEST Protein Shake
-
Terrific Pork Tacos
Hey Everyone!
Today’s post is a recipe for a quick and easy dinner. It is perfect for when you are in a rush or just need something that is quick to make. You can customize them and make it the way you want it. It works really well for Shane and I, as we like different ingredients.

Ingredients:
1 Package Hard or Soft Taco Shells
1 Package Seasoned Pork Carnitas
1 Avocado Diced
1 Bundle of Cilantro Chopped
1 Jar of Jalapenos
1 Bag Mexican Style Shredded Cheese
1 Container of Sour Cream
1 Jar of Avocado Salsa
1 Red Onion Diced
1 Tomato Diced
1 Lime Sliced into Small Wedges
Recipe:
- Heat your soft taco shells in a skillet for 15-30 seconds or heat your hard taco shells in the oven on 200 degrees fahrenheit for 4-5 minutes.
- While your shells are heating, cook your seasoned pork carnitas according to the package instructions. (I like the Kroger brand and I heat it in the microwave for 4 minutes).
- When your meat has finished heating shred it. (I use my KitchenAid.)
- Add your desired amount of meat to your taco shells.
- Proceed to add the ingredients you want from above, you can add as much or as little as you want.
- Enjoy.
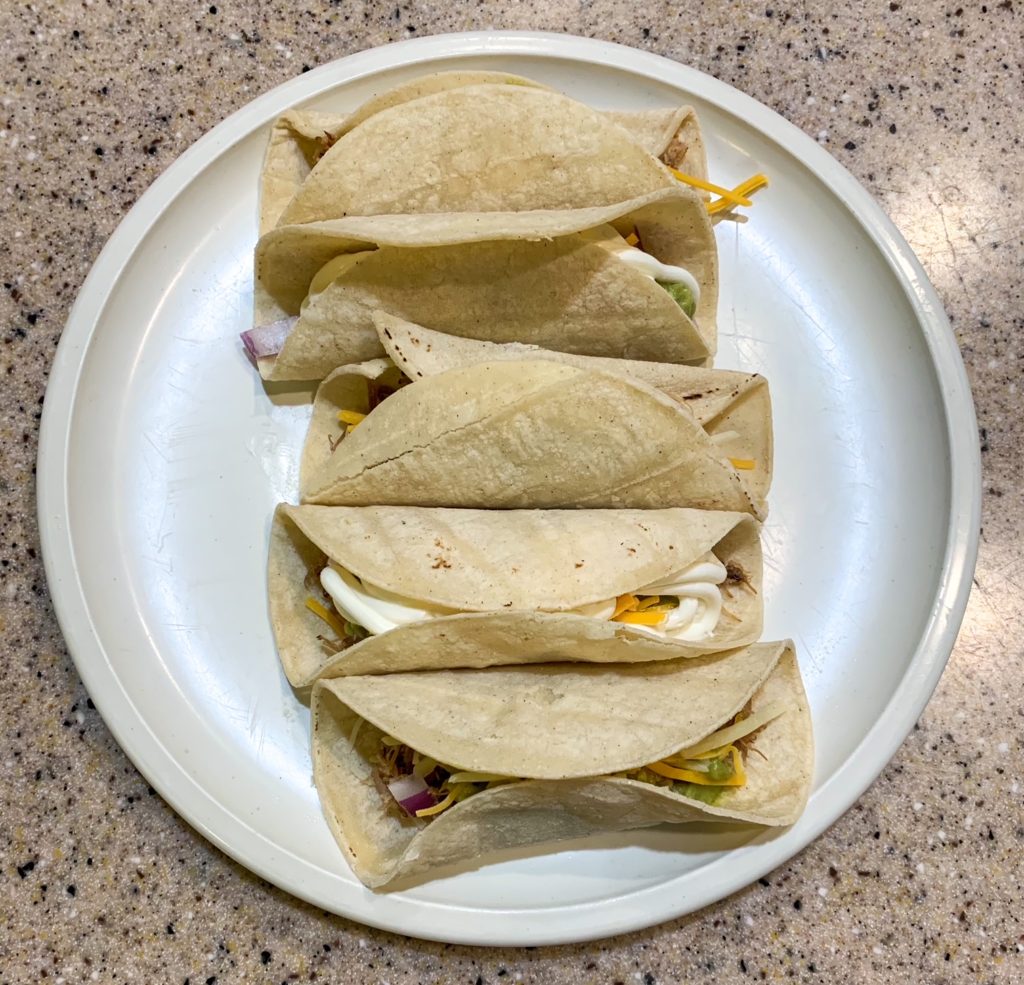
Shane and I love to have this for dinner. We love how different you can make your tacos. I hope you love this recipe as much as I do. Please let me know in the comments below, if you do. If you are interested in more healthy recipes please subscribe below.
You May Also Like
The BEST Protein Shake
-
Simple Shrimp
Today’s post is a recipe for air fryer shrimp. It is perfect for when you are in a rush or just need something that is quick to make. I like to make it for lunch because it’s simple, healthy, and Shane hates shrimp. That way I can enjoy it without feeling guilty that he won’t have anything to eat.
Ingredients:
2 Shrimp Skewers (Seafood Department 5 shrimp per skewer)
1 Tbsp Spray Olive Oil
1 tsp Cajun Seasoning
Recipe:
- Preheat your airfryer to 390℉.
- Spray both sides of your shrimp skewers with your olive oil spray, just a thin layer.
- Lightly season each side with your cajun seasoning.
- Lay them criss-cross in your air fryer and cook for 6 minutes.
- Enjoy!
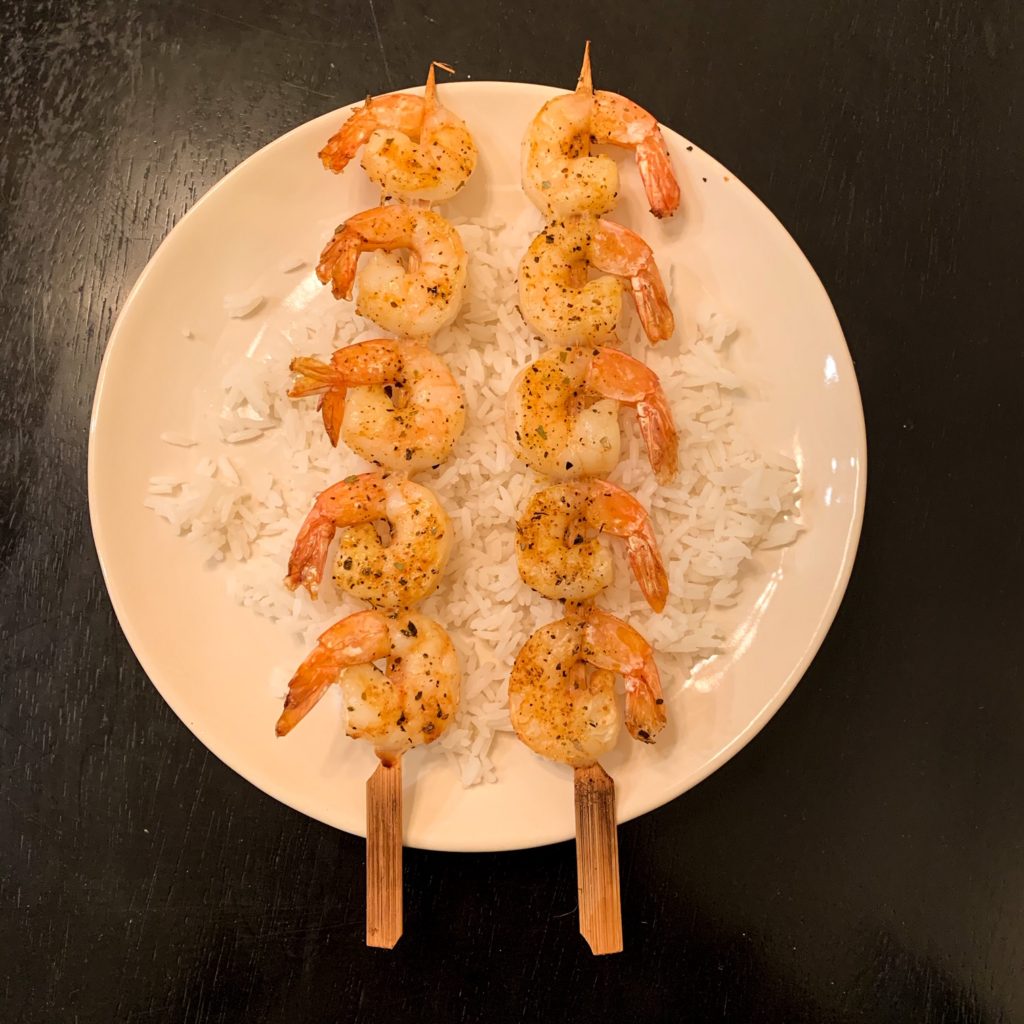
I hope you love this recipe as much as I do. I love to eat this by itself or over a plate of rice. Please let me know in the comments below, if you do. If you are interested in more healthy recipes please subscribe below.
You May Also Like
The BEST Protein Shake
-
Honey Garlic Shredded Chicken
Hey Everybody!
Today’s recipe is one for honey garlic chicken. I love this recipe because it is tastes so good and it’s fairly easy to make. I got the idea for this recipe partially from Pinterest but have altered it over time to make it healthier. This is another recipe for the Instant Pot.
This recipe generally takes only about 30 minutes from start to finish.
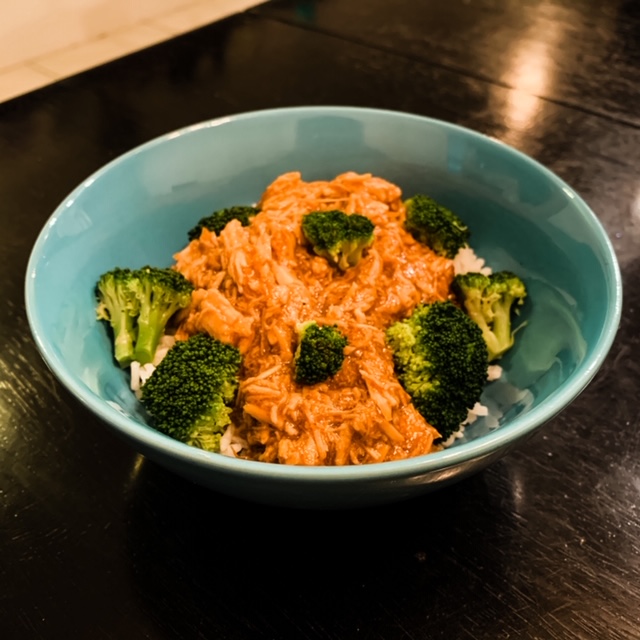
Ingredients
1 lb. Chicken Breast (thawed)
½ Cup Honey
2 Tbsp. Soy Sauce
3 tsp. Brown Sugar
1 tsp. Onion Powder
¼ Cup Ketchup
2 Tbsp. Vegetable Oil
4 Minced Garlic Cloves
3 tsp. Cornstarch
¼ Cup Water
Additional: Jasmine Rice and Broccoli
Instructions
- Set you raw chicken breasts in the bottom of your Instant Pot and season with salt and pepper.
- In a separate bowl, combine honey, soy sauce, brown sugar, onion powder, ketchup, vegetable oil, and garlic cloves. Mix well and pour over the chicken.
- Put your Instant Pot lid on and set your Instant Pot to the Meat Setting on High Pressure for 15 minutes.
- While your chicken is cooking, start your jasmine rice and steam your broccoli.
- Mix your water and cornstarch together.
- Once the 15 minutes is up, quick release. Remove your chicken from the Instant Pot and shred it.
- Add your cornstarch and water mixture to your Instant Pot and change the setting to Sauté. Mix until slightly thickened. (About 3-5 Minutes)
- Return your chicken to the Instant Pot and mix with the sauce. Serve with rice and broccoli.
I have learned a few tips while making this recipe that I would love to share with you. Shred the chicken with your KitchenAid if you have one, it’ll make your life so much easier. If you have someone to help you, one should shred the chicken, while the other is mixing the sauce. Don’t use frozen chicken, it won’t taste nearly as good and may even burn (speaking from experience). If you like a lot of sauce or want to put it on your broccoli you can double all of the sauce ingredients.
I really enjoy this recipe and I hope you do too. Let me know what you think about this recipe in the comments below. If you love this please subscribe as well!
[email-subscribers-form id=”1″]
You May Also Like
The BEST Protein Shake
-
Tasty Tilapia
Hey Everybody!
Today’s recipe is one for tasty tilapia. I love this recipe because it is so easy to make. It’s one that I came up with on my own, after trying many recipes that I didn’t like. This recipe makes about four servings.
This recipe generally takes only about 20 minutes from start to finish.
Ingredients
4 Filets of Tilapia (I like to use Costco’s pre-packaged filets)
1 Egg
¼ Cup of Grated Parmesan Cheese
1 Tsp. Oregano
½ Tsp. Garlic Powder
1 Tbsp. Lemon Juice
1½ Cups of Minute Brown Rice
1½ Cups of Water
1 Can of Del Monte French Cut Sea Salt Green Beans
Instructions
- Preheat oven to 425⸰F.
- Start boiling your water in a pan.
- In a rectangle shaped container, whisk your egg (if it doesn’t whisk well, add a little bit of water).
- In a separate rectangle shaped container, mix your parmesan cheese, oregano, and garlic powder.
- When the water starts to boil add your rice, stir, put your lid on top, and remove from heat. (You want to do this near the beginning as brown rice takes longer to soak up the water).
- Now you want to get your baking sheet ready, I like to line mine with tin foil for easy clean up.
- Next, we will batter our fish. Take a filet, dip it in the whisked egg, dip it in the parmesan cheese mixture, then set it on the baking sheet. Repeat for other four.
- Once your oven is preheated, you can put your fish in. Cook for 10-12 minutes. (Check that the internal temperature has reached 145⸰F, I will insert the thermometer I use below.)
- Now heat your beans in a separate pan on medium low.
- When the fish is done, everything else should be as well. I add a little bit of lemon juice to garnish both my fish and my rice. I also sometimes add a little spray butter to my rice and beans. Enjoy!

I really enjoy this recipe and I hope you do too. Let me know what you think about this recipe in the comments below. If you love this please subscribe as well!
[email-subscribers-form id=”1″]
You May Also Like
The BEST Protein Shake
-
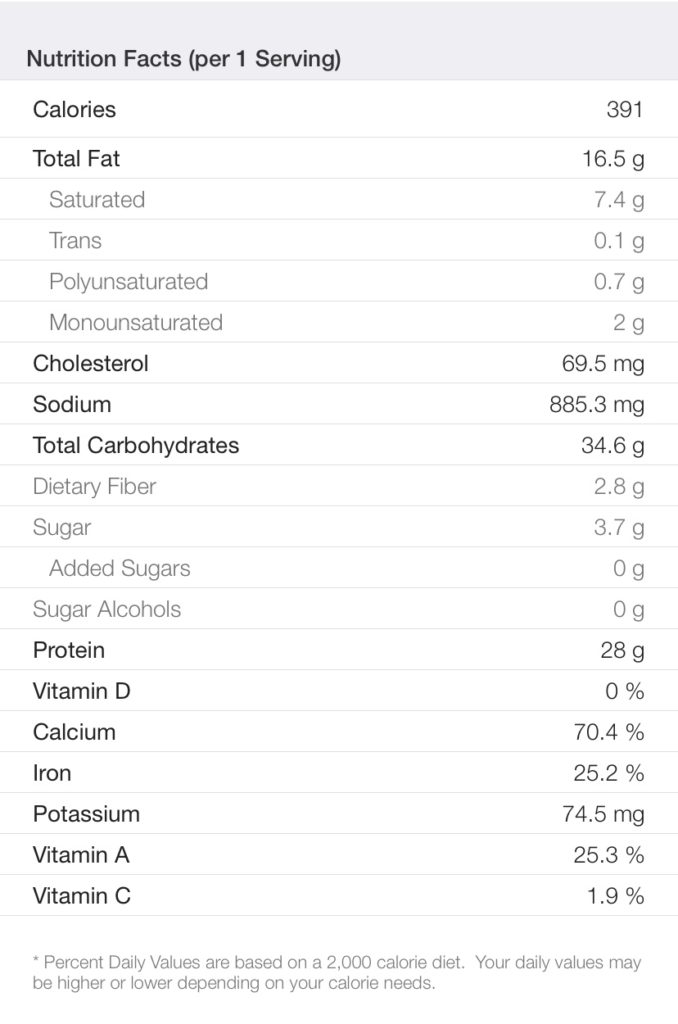
Perfect Pesto Pasta
Hey Everybody!
Today’s recipe is one for a crockpot pesto chicken pasta. Shane and I have been really interested in finding meals that we can prepare in the morning and eat pretty soon after we get home from skiing. We are always exhausted and the last thing we want to do is cook. I originally got this recipe from Pinterest from themagicalslowcooker.com by Sarah Olson. I have made a few modifications as I wanted to make it a little healthier!
This recipe generally takes about 5 hours and 15 minutes from start to finish. Although you can cook the chicken longer if you are not home during that time frame! This recipe is for 8 servings so plan accordingly. Shane and I usually half the recipe!
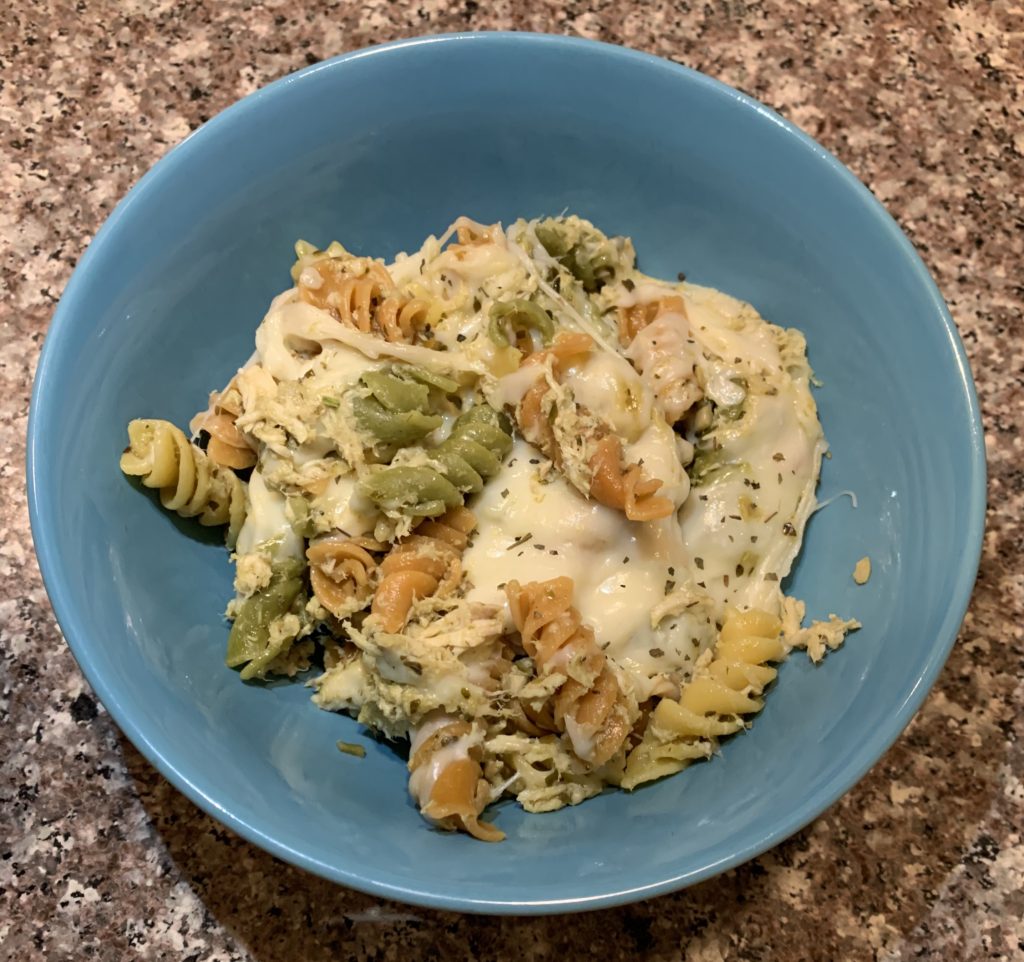
Ingredients
1½ lbs. Chicken Breasts
½ tsp. Salt
¼ tsp. Pepper
1 jar (6 oz.) Pesto (I used Barilla Rustic Pesto)
¼ cup Salted Butter
2 Tbsp Lemon Juice
1 box Veggie Rotini (I use Ronzoni)
½ cup Parmesan Cheese
1/2 cup Lowfat Shredded Mozzarella Cheese
¼ tsp. Dried Basil
Instructions
- Add
liner to your crockpot. This will make cleaning up 10X easier! - Add the chicken to the crockpot. Sprinkle with the salt and pepper. Spread over the pesto, pour the lemon juice over the chicken. Cut the butter into slices and lay over the chicken.
- Cover and cook on low for 5-6 hours without opening the lid during the cooking time. *We have cooked ours up to 10 hours like this and it still tasted fine!
- Near the end of the cooking time, cook the pasta according to the package directions and drain well.
- Shred the chicken by taking it out of your crockpot and putting it into your KitchenAid. Use the flat beater attachment, lock the KitchenAid and turn it on 3 for 30 seconds. This should shred your chicken evenly. Add the chicken back into the crockpot. (You can also shred your chicken with forks, I just prefer to use my KitchenAid because it is easier!)
- Add the cooked pasta and the parmesan cheese to the crockpot, stir everything until the pasta is coated with the buttery pesto sauce and the chicken is evenly dispersed throughout the pasta. Add the mozzarella cheese over the pasta. Cover for about 15 more minutes or until the cheese has melted.
- Garnish with dried basil. Serve and enjoy!
I really enjoy this recipe and I hope you do too. It is perfect, heated up for leftovers as well! Let me know what you think about this recipe in the comments below. If you love this please subscribe as well!
[email-subscribers-form id=”1″]
You May Also Like
The BEST Protein Shake
- Add
-
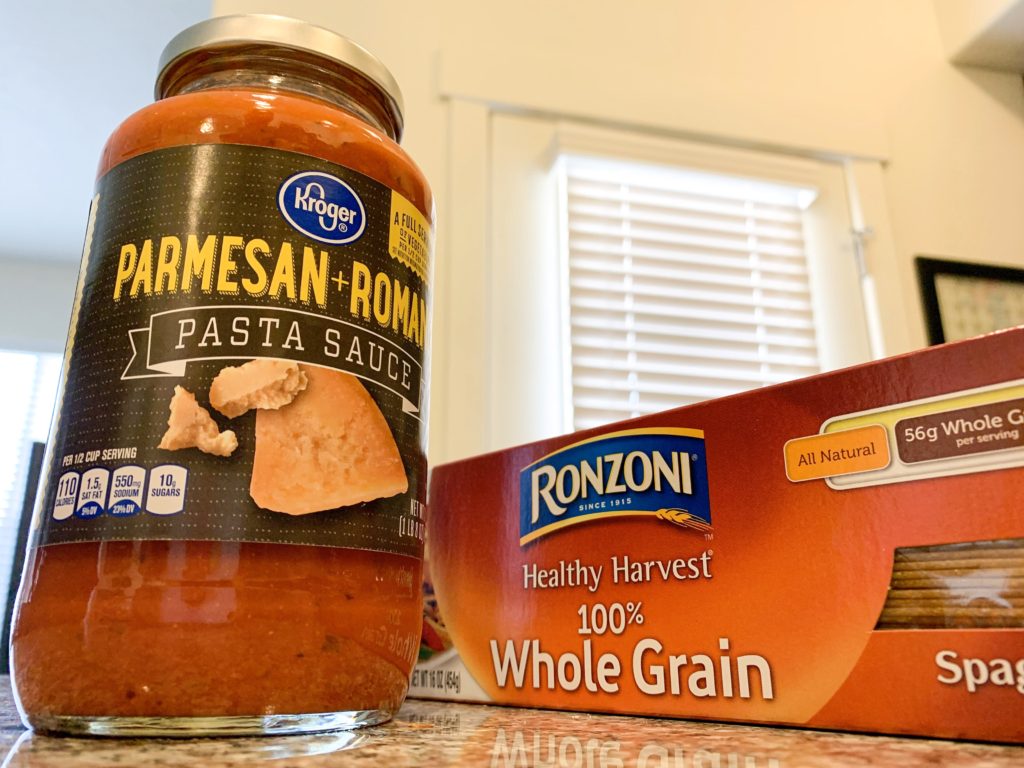
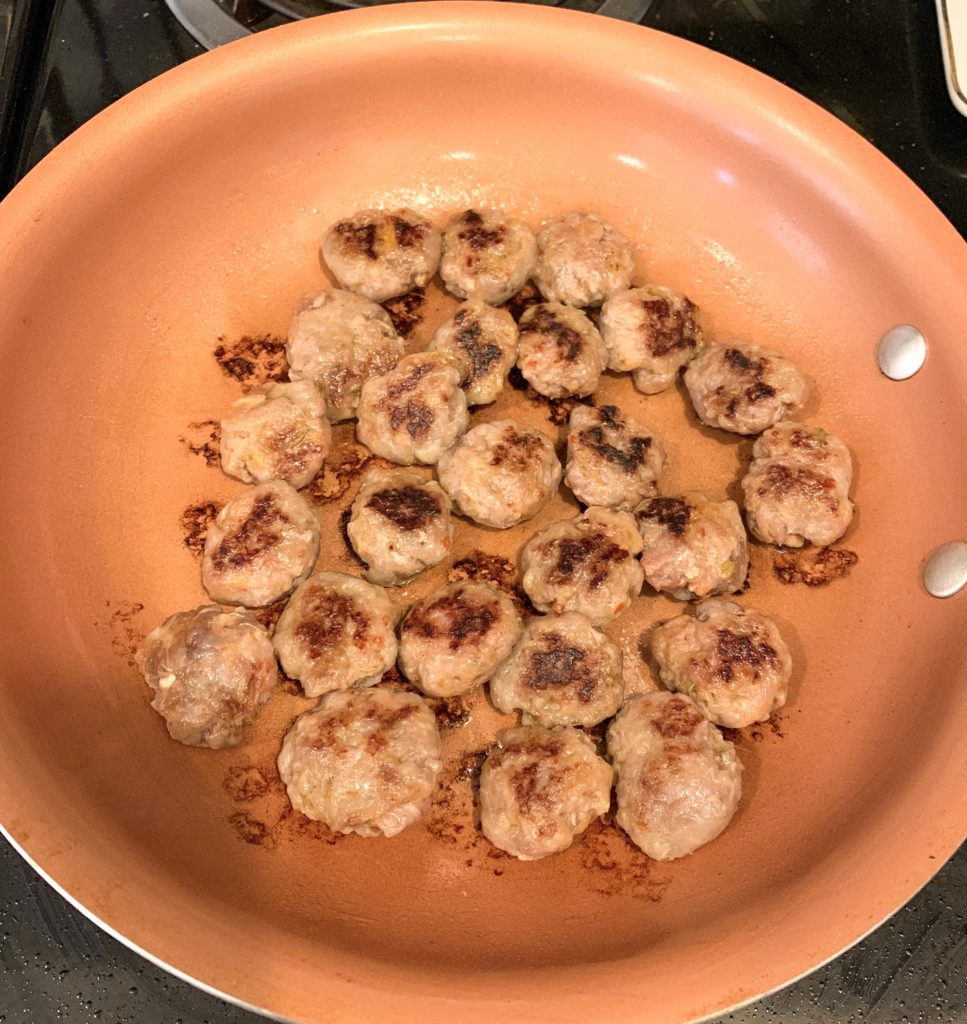
Smart Spaghetti
Hey Everybody!
Today’s meal is a healthy version of spaghetti. It is one of my easiest meals that I make and it is also Shane’s favorite, so it’s a go to for us. We eat this at least once a week.
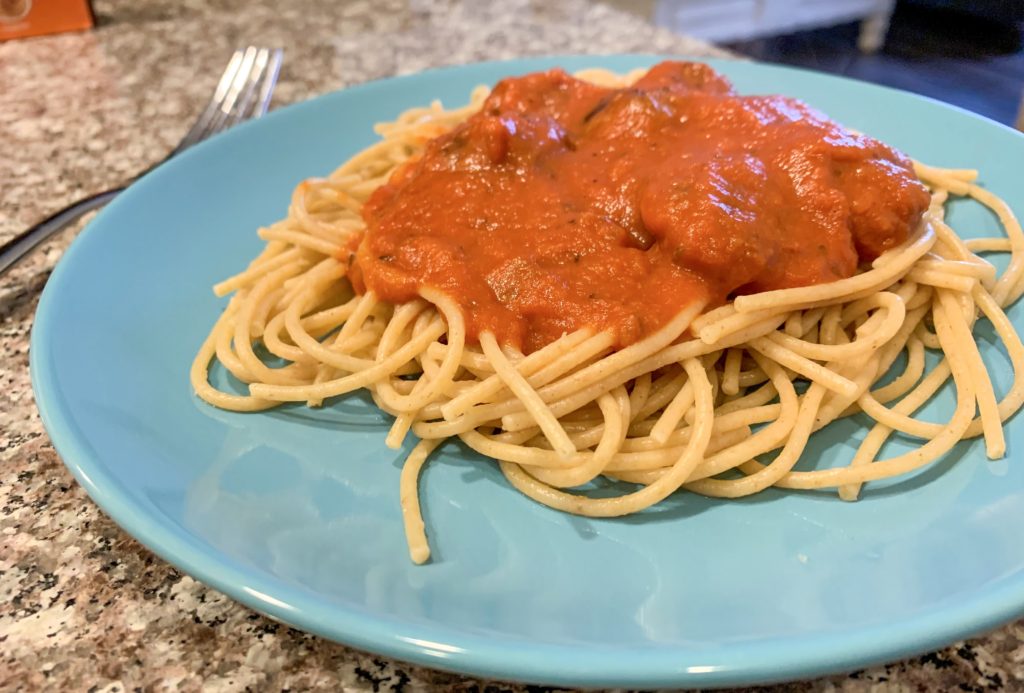
Ingredients
½ Box of Ronzoni 100% Whole Grain Spaghetti Noodles
1 Jar of Kroger Parmesan & Romano Pasta Sauce
2 Italian Sausages (I like Mild)
Recipe
1. Heat up a frying pan on medium heat and another medium saucepan halfway filled with water on high.
2. While these are heating, decase your Italian sausages and make them into small patties.
3. When you are finished, put them into the frying pan, so they are all laying flat next to each other.
4. The water should be boiling in the saucepan by now so add half of your package of noodles, by breaking them in half. Dash a small amount of salt into the water (to prevent sticky noodles).
5. Start the timer for 10 minutes. Stir your noodles occasionally throughout this time.
6. Your sausages should be about ready to flip over, flip one over with a fork to make sure it has cooked to your liking, then flip the rest.
7. Once all of your sausages are cooked on both sides, I put mine into a small bowl and set it aside.
8. Drain your grease from the frying pan and bring the pan back to the heat lowering it to medium-low.
9. Add your pasta sauce to the frying pan and stir occasionally.
10. Drain your noodles when the timer goes off.
11. Add your sausage back to the frying pan into the sauce.
12. Once your sauce has heated to your liking you are ready to eat.
I absolutely love that this recipe only has three ingredients. It makes it very easy to prepare and to shop for. We also almost always have all of the ingredients on hand. I like to buy in bulk so that we have a little bit of a storage just in case. I also buy multiple packages of Italian sausage at the same time. When I get home I decase all of them and put them in freezer bags with two in each one. I just thaw them in the fridge each day we have this for dinner. It makes this meal very convenient.
Let me know what you think about this meal in the comments below. If you love this please subscribe as well!
[email-subscribers-form id=”1″]
You May Also Like
The BEST Protein Shake
-
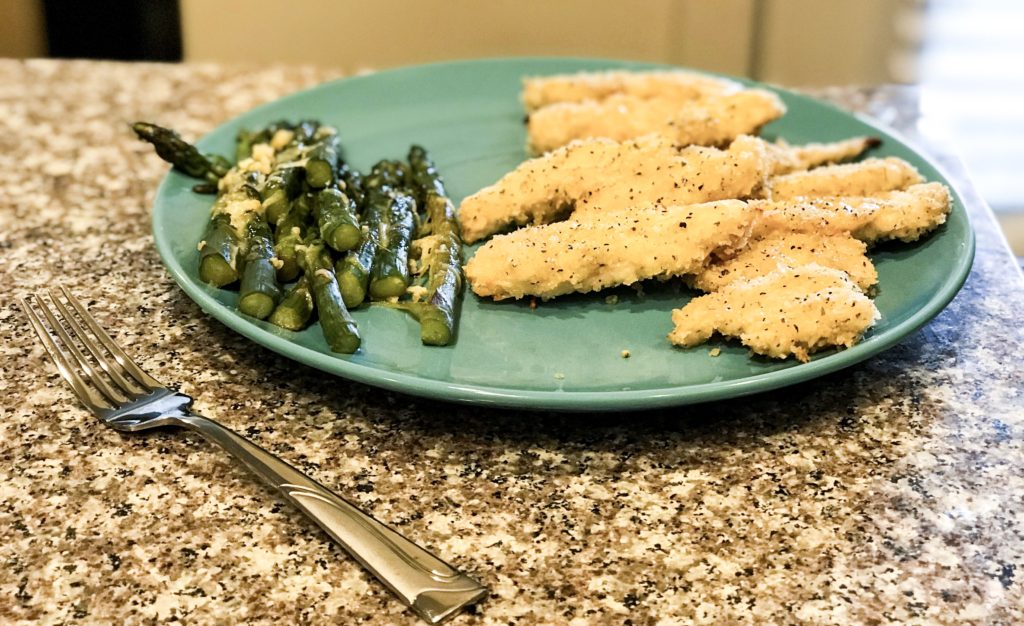
Mouthwatering Lemon Parmesan Chicken and Asparagus
Hey Everybody!
Today’s recipe is one for mouthwatering lemon parmesan chicken and asparagus. I am not kidding you; my mouth is literally watering as I type this. This meal is so delicious, it leaves you constantly thinking about when you can have it next! As I have mentioned before, I am known to be a picky eater so getting those veggies in is so tough for me. I have learned to love asparagus because of this meal!
I got this recipe from one of my good friend’s Lars Sundwell.
He got the recipe from Chelsea’s Messy Apron, though they call it one pan lemon parmesan chicken and asparagus. I think that title is misleading as this uses many items in the kitchen in order to prepare. (Though it is well worth it every time)
This recipe generally takes about 40 minutes from start to finish.
Ingredients
1 ½ pounds boneless skinless chicken breasts or tenders
1/3 cup flour
1 cup panko (found on the Asian Cooking Aisle)
1 cup parmesan cheese separated
1 teaspoon dried parsley
1/2 teaspoon garlic powder
3-4 lemons
1 tablespoon minced garlic
8 tablespoons melted butter separated
1 tablespoon lemon pepper seasoning
1 pound asparagus
3 tablespoons olive oil
3 tablespoons honey
Optional: fresh parsley, 1 lemon for topping
Instructions
- Preheat the oven to 400 degrees F. Line a large sheet pan with parchment paper and set aside.
- Grab three bowls. Add the flour to one bowl.
- Combine panko, 1/2 cup freshly grated parmesan cheese, dried parsley, garlic powder, about 1/2 teaspoon each of salt and pepper. Stir.
- In the final bowl, add 1-2 teaspoons lemon zest, 4-5 tablespoons lemon juice (depending on lemon flavor intensity desired), minced garlic, and 5 tablespoons melted butter. Stir. Remove 4 tablespoons of this mixture and set aside.
- Slice chicken breasts to the size of tenders (about 1 and 1/4th inch strips) or use chicken tenders.
- Coat in flour, heavily dredge in garlic lemon mixture, and then coat in the Parmesan panko mixture.
- Place on prepared sheet pan. Use any remaining Parmesan panko mixture and sprinkle over tenders. Sprinkle lemon pepper seasoning over the tenders (I use Mrs. Dash lemon pepper)
- Bake in preheated oven for 10 minutes and remove.
- Flip the tenders to the other side.
- Place the asparagus next to the tenders and drizzle the reserved lemon butter sauce. Sprinkle remaining 1/2 cup Parmesan cheese over the asparagus and toss with tongs.
- If desired place lemon slices over the chicken (optional)
- Return to the oven and bake for another 10-12 minutes or until the internal temperature of the chicken has reached 165 degrees F.
- Meanwhile, whisk remaining 3 tablespoons melted butter, 3 tablespoons lemon juice, 1-2 teaspoons lemon zest, 3 tablespoons olive oil, and 3 tablespoons honey in a small bowl. Add some pepper and parsley if desired.
- Remove from the oven and top with the honey lemon mixture and fresh parsley if desired and enjoy immediately.
- Do not top chicken breasts with the honey lemon mixture unless eating immediately and aren’t planning on having leftovers since it will make it soggy.
If you want to visit the original site go to: https://www.chelseasmessyapron.com/one-pan-lemon-parmesan-chicken-and-asparagus-video/
They even have a printable version of the recipe!
A few things that I have learned through making this recipe several times is that I like to steam my asparagus before baking it in the oven, if you forgot to get the lemons at the store it’s not the end of the world lemon juice works just fine, if you are cooking with your husband in the room make sure he knows that you set extra sauce to the side that you will be using (mine thought it was just another dirty dish and washed it down the drain lol).
Let me know what you think about this recipe in the comments below. If you love this please subscribe as well! You have got to try this one out. You will not be disappointed.
[email-subscribers-form id=”1″]
You May Also Like
The BEST Protein Shake
-
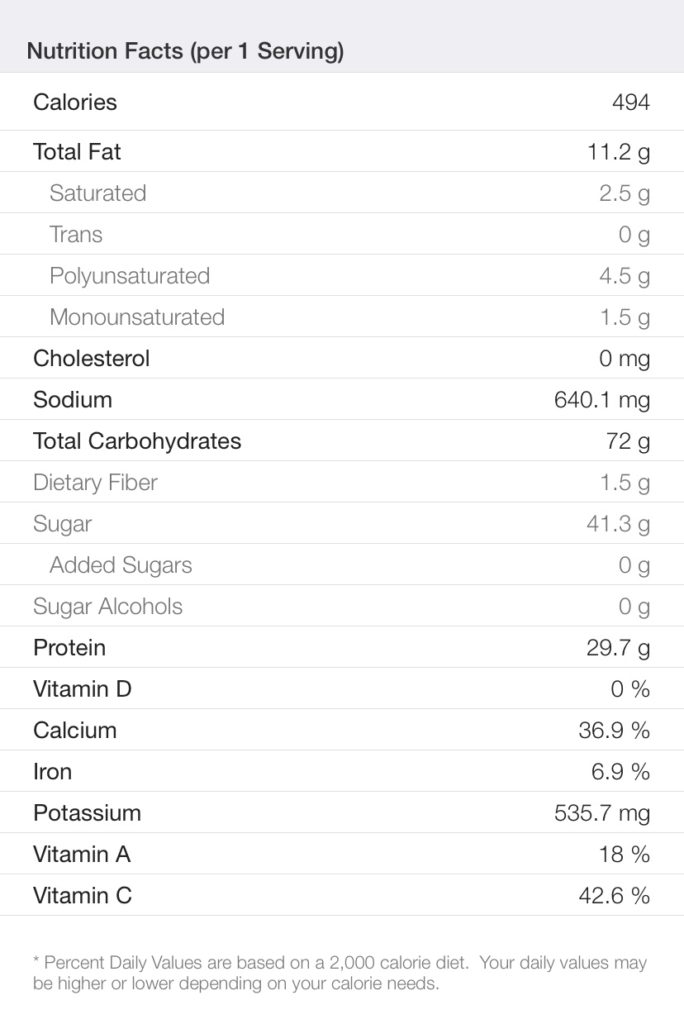
Delicious and Nutritious Rice Bowl
Hey Everybody!
Today’s meal is a delicious and nutritious rice bowl. This is one of my absolute favorite healthy recipes that I like to incorporate into my weekly meals.
If you are into meal prepping, this is also very good for several days as well.
The recipe below is for one serving so remember to adjust according to how many servings you are wanting to make.

1 cup 90% Lean Ground Turkey
½ cup Pinto or Black Beans
2/3 cup Jasmine Rice
1/3 cup Pico De Gallo
Depending on if I am prepping for the week or for one meal, I prepare this recipe differently.
Prepping: I cook the entire package of my ground turkey. I then cook enough rice proportionally to my cooked meat. I put these in a Tupperware along with my beans that are not heated up. I put my Pico de Gallo in another container so it will not be heated up with the others. I then heat these for about 1 minute and 30 seconds and stir. I check the temperature and if it is good, I add my Pico.
One Meal: If I am cooking this as one meal, I will measure each of the ingredients out and cook them. I then combine them all and eat them right after. (A trick with this is that I freeze the excess meat in freezer bags in the appropriate amount so I can easily thaw and make this meal again.)
I absolutely love that this recipe only has four ingredients. It makes it very easy to prepare and to shop for. I also love to use Salsa Queen’s Pico De Gallo, if you are in Utah it is a local brand and you can buy it at Smith’s.
Let me know what you think about this meal in the comments below. If you love this please subscribe as well!
[email-subscribers-form id=”1″]
You May Also Like
The BEST Protein Shake